10 Implementation Guides
10.2 Obtaining Plant Materials
Obtaining the appropriate species and stocktype for a revegetation project takes good planning and lead time. To obtain genetically adapted materials often requires the collection of plant materials near or in the general geographic area of the project site. This requires collecting plant materials several years in advance of project implementation. The group of implementation guides in the following section focuses on three types of plant materials — seeds, cuttings, and plants. Section 10.2.1, Collecting Wild Seeds, covers how to determine the amount of wild seed to collect, wild seed collection methods, cleaning techniques, storage conditions, and quality testing. Methods for collecting the stems of willows and cottonwoods in the wild (as well as several other native species that propagate vegetatively) are discussed in Section 10.2.2, Collecting Wild Cuttings. Salvaging plants from the wild and replanting them on project sites is discussed in Section 10.2.3, Collecting Wild Plants.
For most projects, the collection of wild seeds, cuttings, or plants is not sufficient to meet project objectives. To increase plant materials, wild collections must be sent to native plant nurseries for propagation. Section 10.2.4, Nursery Seed Production, outlines the basic steps necessary to work with nurseries in establishing seed production beds for increasing seed banks. Producing large quantities of cutting material of willow and cottonwood species can be accomplished by establishing stooling beds from wild collections at nurseries. This is covered in Section 10.2.5, Nursery Cutting Production. Section 10.2.6, Nursery Plant Production, covers how to work with seedling nurseries to obtain high quality plants.
10.2.1 Collecting Wild Seeds
10.2.1.1 Introduction
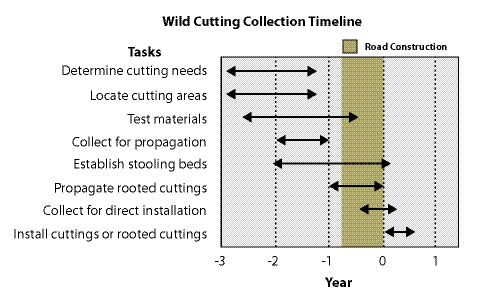
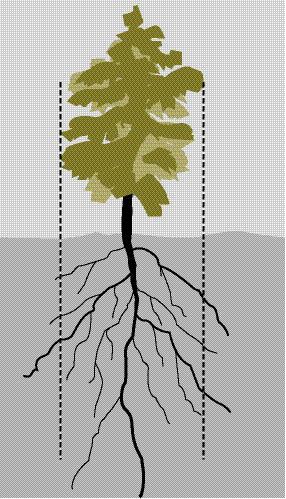
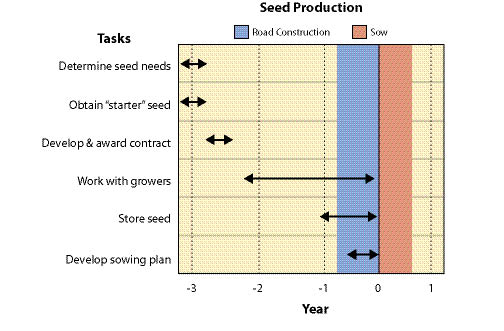
Wild seeds are collected from native stands of grasses, forbs, shrubs, trees, and wetland plants found in or near project sites. The primary objective for wild seed collection is to obtain source-identified seeds for starting nursery grown plants (See Section 10.2.6), nursery grown seeds (See Section 10.2.4), and/or occasionally to sow directly on a disturbed site. Since seed and seedling propagation hinges on availability of wild seeds, collection is one of the first major tasks of a revegetation plan. Depending on the purpose, the lead-time for collecting wild seeds might be up to 3 to 4 years before sowing or planting the project site (Figure 10.49).
Grass and forb species are usually seeded directly onto disturbed sites. In order to obtain enough seeds for direct seeding, wild seed collections are usually "increased" in nursery production (See Section 10.2.4). Trees and shrubs, on the other hand, are not typically seeded across disturbed sites. Wild seed collections for these species are sent to nurseries for seedling propagation, then outplanted. Seeds from wetland genera, such as sedges (Carex spp).and rushes (Juncus spp).are often collected for both seed and seedling production purposes.
Revegetation plans are seldom finalized before wild seeds are collected. At a minimum, planning should have identified revegetation units, described reference areas, determined species to propagate, and completed a survey of the construction site to determine the amount of area to be revegetated. The quantity and location of wild seed collection is based on these early surveys.
Collecting wild seeds can be expensive. Multiple collection trips are often needed to monitor and collect each species. Each species has a small ripening window, and most species do not ripen at the same time. In addition, many species do not consistently produce seeds from year to year, requiring multiple year collections. Working around these complexities to obtain adequate supplies of wild seeds requires excellent planning and administration of seed collection and cleaning contracts.
Before collecting wild seeds or setting up collection contracts, it is worth the effort to contact Forest Service district or BLM area offices first to see if seeds are already available for your project. Often these local agencies will have seeds in storage for many of the species growing near the project area, especially species used for reforestation.
10.2.1.2 Develop Timeline
Wild seed collection should be one of the first tasks to consider when beginning revegetation planning because other tasks, such as seed and seedling propagation contracts, cannot be conducted without this plant material. Up to 3 or 4 years are often necessary in order to locate, collect, clean, and test wild seeds, and still allow the nursery or seed producer enough lead time for plant and seed production (Figure 10.49).
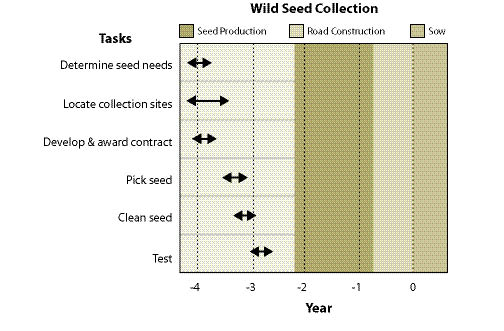
The seed collection contract is awarded early in the spring to give the contractor enough time to locate and assess the collection areas. Seeds are monitored from June through August and collected when ripe. Wild seed harvests are cleaned from September through October and then tested. Results from seed testing facilities are returned by December. Seeds designated for seedling propagation must be sent immediately to the nursery for preparation for sowing in early winter. If seed propagation is the objective, seeds are stored until the following summer and sent to seed producers for a late summer sowing.
10.2.1.3 Determine Wild Seed Needs for Seed Production
Wild seed collection and the nursery seed increase contracts are often developed simultaneously because the information needed for wild seed collection is based on the expected seed yields of the seed increase contract. This section describes how to calculate the amount of wild seeds to collect based on the amount of seeds expected from a nursery seed producer.
The amount of uncleaned wild seeds to collect for seed propagation contracts requires the following information (used in calculations in Figure 10.50):
- Seed needs,
- Years in seed production,
- Sowing rates,
- Annual seed yields, and
- "Cleaned-to-rough cleaned" seed ratio.
Seed Needs — The total seeds needed for each species on a revegetation project is based on the total planned revegetation acreage, seedlot characteristics (germination, purity, seeds per pound), site limitations (how well seeds will survive), and the desired seedling densities after seeds have germinated. The reader is referred to Section 10.2.4.3 for methods to calculate how many seeds are needed for each species in a revegetation project.
| Figure 10.50 — The quantity of wild seeds to collect can be determined from this spreadsheet. Pearly everlasting (Anaphalis margaritacea) is used in this example. |
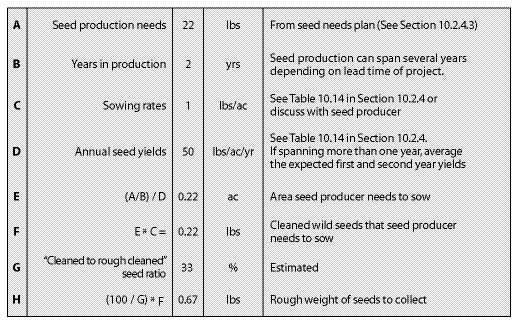 |
Years in Seed Production — Every species has its own seed production characteristics. For instance, species such as blue wildrye (Elymus glaucus) and California brome (Bromus carinatus) produce high seed quantities the first and second year, then level off or decline in years three and four. Species such as fescues (Festuca spp).and Junegrass (Koeleria spp).yield few seeds in the first year, but seed harvest levels increase to full production in the second or third year. For these species, a minimum of two years must be scheduled for seed production. Table 10.14 in Section 10.2.4 shows first- and second-year yields for some commonly produced species.
Since seeds can be stored for many years, seed production does not have to occur all in one year. For projects that have several years lead time, maintaining production fields gives the revegetation specialist more flexibility. By spreading the seed production over several years, the acreage in production and the amount of wild seed to collect can be cut in half. For example, if 800 lb California brome (Bromus carinatus) seeds for a revegetation project are needed and there are two production years to produce it in, the amount of seeds to produce per year would be 400 lb. Since half the acreage would be sown, the amount of wild seed to collect would be cut in half, from 10 pounds to 5 pounds.
Sowing Rates — All growers require a minimum amount of clean, wild seeds to produce a given quantity of nursery-grown seeds. While these rates differ somewhat between seed producers, general sowing rates for commonly propagated species are shown in Table 10.14 in Section 10.2.4.
Annual Seed Production Yields — The amount of seeds that are produced annually varies by species, geographic location of the fields, weather conditions, and experience of the seed producer. Knowing what yields can be expected from seed producers will determine how many acres will be under production and the amount of wild seeds needed to start the crop. Average seed yields for some species are presented in Table 10.14 in Section 10.2.4.
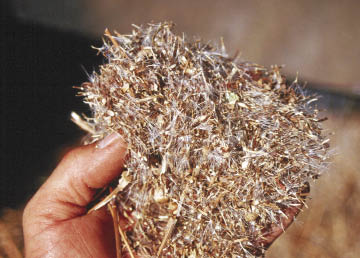
Cleaned-to-Rough Cleaned Seed Ratio — Seed collection from the wild will include stems, chaff, and flower parts (Figure 10.51). This material should be cleaned as much as possible by the seed collectors before it is sent to the seed extractory for final cleaning. The amount of non-seed collected can be a substantial part of the wild seed collection weight. "Cleaned to rough cleaned" seed ratios (Table 10.12) can help calculate the extra weight of seeds to collect in the wild to compensate for seed cleaning. Dividing the desired amount of cleaned seeds by this ratio will yield the amount of wild seed that needs to be collected.
10.2.1.4 Determine Seed Needs for Seedling Production
The quantity of wild seeds to collect for propagating seedlings at plant nurseries will be based on an estimate of 1) quantity of seedlings needed, 2) % seed germination, 3) % seed purity, 4) seeds per pound, and 5) nursery factor. An estimate of germination, purity, and seeds per pound can be obtained through published sources, seed inventories, or from seed extractory managers. The nursery factor is a prediction of the percentage of viable seeds that will actually become "shippable" seedlings. Each nursery has developed a set of factors based on culturing experience and practices. Nursery managers should supply nursery factors for each species or information on the amount of seeds to collect to meet the seedling order. Nursery factors are often less than 50%.
Using the following equation, the amount of wild seed to collect can be estimated:
Wild seed to collect = quantity of seedlings needed
(% germ/100 * % purity/100 * seeds/pound * nursery factor/100)
10.2.1.5 Locate Plants in the Wild
Collection areas are located in the field during the vegetation analysis phase (See Section 6.2). General collection locations can be established by the revegetation specialist under the direction of a botanist familiar with the local vegetation. Contracts often require seed collectors to identify individual collection areas for approval prior to collection. Since seed collection can start in late spring for some species, collection site location must be completed by this time.

Collection areas for each species should not occur in one location, but represent a cross-section of populations in the general area of the project. A minimum of five collection areas, at least a mile apart, should be identified for each species. This ensures that a range of genetic characteristics is represented in each seedlot. While some populations will be located in the project area, most areas will have to be found in adjacent areas. When seed collection is conducted outside of the project area or agency administered lands, permission must be obtained from the landowner or manager.
Collection sites must be free of any plants listed as noxious weeds by the Oregon Department of Agriculture ("A and B" weed lists) because of the potential of seed contamination. Once located, the collection sites should be marked with flagging at a point easily visible from the road used to access the site. The flagging should have a written description that includes the GPS location (including elevation and UTM [Universal Transverse Mercator] coordinates) or a compass bearing and approximate distance in feet from the access road to the collection site. Each site should be approved by the revegetation specialist/botanist. Locations will be numbered sequentially and the location placed on 7.5° topographic maps and each collection site must be described and documented in the field notes.
10.2.1.6 Collect Seeds
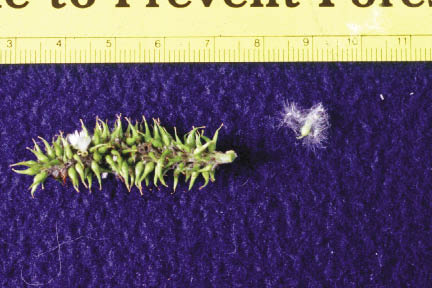
Only viable seeds that are visually sound and sufficiently mature should be collected. Seeds are considered sound when the embryo is developing normally and there is no evidence of insect, disease, climatic, or other types of damage. Seed maturity in plants with fleshy fruits (many shrub and some tree species) often corresponds with changes in color (e.g., color changes from green to red, blue, purple, or white), taste (higher in sugars when mature), or hardness (fruit softens with maturity). Wind-dispersed seeds (which include many of the conifer species) usually change from green to brown when ripe. For grass species, seed maturity can be determined by how seeds respond to being squeezed (Inset 10.11). Since seed ripeness is influenced by the local weather and microclimate, determining seed ripeness often requires several monitoring trips to the field prior to collection.
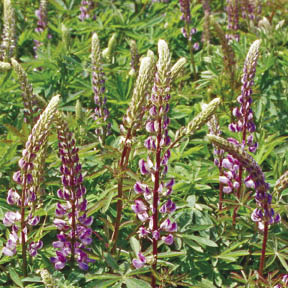
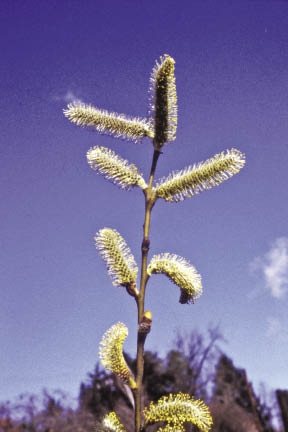
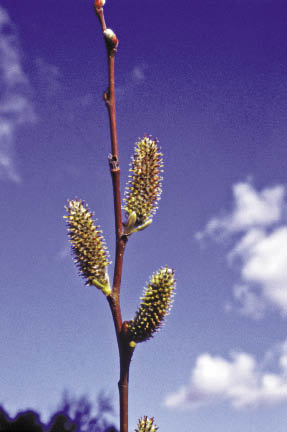
Seed collection techniques are tailored to the species being collected. Grass and forb species, for instance, can be hand-harvested by stripping or clipping stems just below the seed heads and placing them in collection bags or containers. Collection bags should be made of materials that allow airflow, such as paper or fine mesh. Plastic bags or plastic containers should not be used. Other methods of collecting grass and forb seeds include mechanical flails and vacuums. While these methods can increase seed harvesting rates significantly, they must be done on nearly pure stands of a single species to avoid contaminating the seedlot with more than one species. Some forbs, such as lupine (Lupinus spp.), have indeterminate inflorescence, which means they continuously bloom, starting from the bottom of the flower head and progressing to the top (Figure 10.52). These species present a problem in seed collection because seeds ripen continuously through the growing season. Seeds from these species are often obtained by making multiple trips to the field and collecting seeds from the lower portions of the stem without disturbing the flowers or immature seeds above.
Seeds of many shrub species are often collected by holding a bag or tray under the plant and shaking the plant or flailing the branches with a stick or tennis racket. While the seeds of some shrub species ripen and remain on the seed head, others, such as Ceanothus spp., shatter when they ripen and must be collected as soon as they ripen. Since multiple collection trips can be expensive, an alternative approach is to enclose the seed head of each plant in a mesh or paper bag before the seeds have begun to ripen. At the end of the season, ripened seeds will have dispersed into the bags, which can be easily collected. The seed collection contractor should specify the methods that will be used for collection.
Seeds should be collected in approximately equal quantities from approved collection areas (See Section 10.2.1.5). To ensure adequate genetic representation, collect from a large number of widely spaced or unrelated parent plants per area (over 50 is optimal). To preserve populations, no more than 50% of the seed crop at each site should be collected in a year. Seeds or seed bearing fruits should not be collected from the ground.
Each seed collection bag or container must be clearly identified in the field with the following information:
- Species (scientific name),
- Forest or BLM district,
- District or BLM resource area,
- Legal description,
- Date of collection,
- Name of collector,
- Number of populations collected,
- Elevation, and
- Road project name.
The Forest Reproductive Material Identification Tag is an excellent way to capture this information (Figure 10.53). These are often available at Forest Service district offices or seed extractories. To assure the identity of the seedlot in case the tag is accidentally removed during handling or shipping, it is a good idea to duplicate the tag and place it into the collection bag. Field collections must be grouped into seedlots prior to sending these collections to the seed extractory for cleaning. Individual collections within a species are only maintained as separate seedlots if the objective is genetic testing or research. The expense of cleaning, packaging, and keeping records of a multitude of collections outweighs the necessity of storing them separately.
| Figure 10.53 — A Forest Reproductive Materials Identification Tag should be completed and attached to each collection bag sent to the seed extractory. A copy should also be placed inside the bag. |
 |
The information displayed on the seed tag can be used to identify or name a seedlot. Each seedlot is identified by a seedlot identification code constructed in the following manner:
Species - Forest - Seed Zone - Elevation - Project Name - Collection Year
Species — The species short code can be obtained from the Plants Database on the National Resource Conservation Service website (http://plants.usda.gov/index.html).
Forest or BLM District Office — This is a numerical number assigned to each forest or BLM district office.
Seed Zone or Breeding Zone — For conifer and many native species, seed zones and breeding zones are geographic areas that have been identified by geneticists. Consult with the local reforestation, botanist, or area geneticist for seed zone and breeding zone maps.
Elevation — Elevation is generally listed as a range and abbreviated for conifer and many native species (For example, a 4,000 to 5,000 elevation band is listed as 4,050).
Project Name — The highway or revegetation project name is usually abbreviated.
Collection Year — The year in which the seeds were collected is abbreviated.
Certification — Certification codes apply to conifer tree species and are used to differentiate what is known about the parentage of the seeds. For example, codes pertain to whether the seeds were collected from the wild, seed collection areas, seed orchards, or if seeds are from tested material.
For example, the seedlot code, ARNE-10-502-2030-Elk-04, identifies a pinemat manzanita (Arctostaphylos nevadensis) seed source, collected on the Rogue River National Forest in seed zone 502 in an elevation range of 2,000 to 3,000 ft. Seeds were collected for the Elk Creek Road project in 2004.
10.2.1.7 Clean and Test Seeds
Wild seed collections must be cleaned to a standard that can be uniformly applied through seed sowing equipment for seedling production or seed increase. Seed extractories have the experience and equipment to clean wild seeds of most species. Seed cleaning is typically completed in two to three steps: 1) removing seeds from cones or seedpods (conifer species and some hardwood tree and shrub species), 2) detaching structures from seeds, and 3) removing all non-seed materials from collections. Removing seeds from most conifer cones involves using tumbling equipment to allow seeds to separate from scales. Some conifer species and many shrub and hardwood species require specialized equipment to break open the seedpod without damaging the seeds. Detaching seed structures involves the mechanical removal of awns (grasses), wings (conifers), and fleshy structures (shrubs). Once seed structures are detached, all non-seed materials, including stems and chaff, can be removed from the collections, leaving only pure seeds. Seed extractories will dry, package, and store seeds, as well as test seeds on-site or send seeds to a testing facility. It must be noted that seed extractories cannot improve a poorly collected seedlot. For example, seed extractories cannot remove weed seeds, damaged seeds, or immature seeds from a collection, nor separate seeds from different crop species mixed in a seedlot. Prior to collecting wild seeds, it is important to contact the seed extractory manager to discuss which species will be cleaned. Seed extractory managers are great sources of information on collection and care of a variety of native species seeds.
Cleaned seeds should be tested for germination, purity, seeds per pound, and presence of noxious weeds (Inset 10.13) by an approved seed testing laboratory (Inset 10.12). Testing requires representative samples be collected from each seedlot. Seeds are usually stored in large sealed drums or bags. Seeds should be sampled with probes that reach to all parts of the storage container. If there are multiple containers per seedlot, samples from each container should be drawn in proportion to the size of the container. Since the amount of seeds needed for testing may vary by species and laboratory, seed testing facilities should be contacted prior to submitting samples for special instructions.
Seed viability usually decreases with time in storage. Seed testing should be conducted every few years, or at least the year before it is sown, to obtain the most accurate germination rates. Copies of seed tests should be retained in contract files and on seed inventories.
10.2.2 Collecting Wild Cuttings
10.2.2.1 Introduction
Using cuttings can be a viable alternative to planting seedlings or sowing seeds to reestablish native vegetation. Vegetative material is collected from stems, roots, or other parts of donor plants and directly planted on the project site or sent to a nursery to produce rooted cuttings. The potential to produce roots from vegetative cuttings varies by species — from easy to propagate to extremely difficult. The most common species propagated from vegetative cuttings are shrubs and some trees. Many deciduous species that grow well in riparian settings, such as willows (Salix spp).and cottonwoods (Populus spp.), have a high success rate when propagated from cuttings. Most temperate evergreen trees and shrubs, however, only root under very controlled environments with specialized propagation techniques.
The intent of this section is to provide the reader with a greater understanding of how to select and collect cuttings in the wild. The primary focus will be on the species in the genera Salix and Populus, because these are these are most frequently used for direct sticking. Most other temperate tree and shrub species must be sent to the nursery for the production of rooted cuttings before they are installed on project sites (In tropical and subtropical areas, a wider variety of species can be collected as wild cuttings).If temperate species other than willow and cottonwood are considered for propagation, nurseries should be contacted to determine the best methods for selecting, cutting, and handling the material.
Cuttings can be obtained from wild collections or from cultivated stands of donor plants, called stooling beds. Stooling beds are established at nurseries or other agricultural facilities from wild collections. In this section, we will focus on how to obtain cuttings from wild locations and leave the discussion of producing cuttings from stooling beds to Section 10.2.5, Nursery Cutting Production.
| Figure 10.54 — Collecting wild cuttings requires a lead-time of several years depending on whether it is used to propagate stooling beds, rooted cuttings, or direction installation. |
 |
Wild cuttings are used in revegetation projects when 1) seeds or seedlings are difficult to obtain, 2) seeds germinate poorly in the nursery, or 3) cuttings are needed for biotechnical engineering objectives. Seed yields can be low for many species due to a variety of reasons, including poor pollination, disease, and insect damage. Some species, such as pinemat manzanita (Arctostaphylos nevadensis) and Pacific yew (Taxus brevifolia), produce seeds which can be very difficult to germinate in nursery environments. Other species, which include many tree species, produce seeds on an irregular basis; there may be many years between seed crops. Some seeds are difficult to collect either because they are inaccessible (in the upper portions of trees) or the window of seed collection is very narrow (e.g., Ceanothus spp.). For these species, starting plants in the nursery from rooted cuttings may be the only viable and economical alternative (See Section 10.2.6, Nursery Plant Production). Another important use of cuttings is in biotechnical engineering projects. These projects combine the physical strength of cuttings with root strength of establishing plants to increase surface and slope stability (See Section 10.3.3, Installing Cuttings).
When considering the use of cuttings over seeds or seedlings, the benefits must outweigh the potential limitations. Some factors that can limit the successful establishment of cutting material are the accessibility and availability of donor plants, how well the material roots (rooting potential), and how well the material survives once it has rooted. A common oversight when working with cuttings is forgetting that this material is alive and subsequently handling the material poorly. Another oversight is collecting cuttings outside of dormancy, when plants are actively growing. Neglecting either of these facts often leads to failed revegetation projects. This implementation guide covers the major factors that are important to consider when working with wild cuttings.
10.2.2.2 Develop Timeline
Locating cutting areas in the field might seem like a simple task, but it can be quite difficult when you are faced with such realities as land ownership, accessibility of the cutting areas to roads, winter weather conditions, and poor quality of plant materials. For these reasons, a lead-time of several years should be considered for projects requiring large quantities of wild cuttings (Figure 10.54). On large projects, sufficient lead-time allows for the location of potential collection sites and testing of the rooting potential of cutting material. If cuttings are used to propagate stooling beds (See Section 10.2.5), which are recommended for large projects, cuttings need to be collected at least 2 years or more before cuttings are installed on a project site. If the material is to be used to produce rooted cuttings at a nursery, the material should be collected at least a year prior to installation. When the materials are cut for direct installation on a project site, the cuttings will be made in the fall through winter prior to planting.
10.2.2.3 Locate Cutting Areas
The vegetation assessment during the planning phase (See Chapter 6) is an opportunity to locate potential sources of cuttings. During this field survey, cutting sites are mapped and assessed for the following characteristics:
Proximity and Accessibility — Good sources for cuttings are not always found within the project site, so it is necessary to survey large areas. Sometimes good collection sites are miles away from the project, which can substantially increase costs. However, the benefits of collecting quality plant materials far outweigh the additional transportation costs. The large size and weight of cutting materials often limits collections to areas adjacent to and accessible by roads. Poor road conditions during the winter months, when cuttings are most likely to be collected, should be considered in site selection, because of the potential of being closed by snow or winter road damage. It is often possible to collect quality cutting material within the right-of-way clearance, which is identified during the vegetation assessment.
Ownership — Some of the best collection sites may be on private lands. Always obtain permission from the landowner prior to collecting. Cutting from areas located on federal, state, and local government managed lands must be coordinated through these agencies. Observe collection standards for size and quantity dictated by the landowners.
Viability — The quality of the cutting material is an important criteria for determining the suitability of a collection site. Determining the viability of the collection material should be completed prior to selecting the collection site (See Section 10.2.2.4).
Genetic Considerations — It is important to determine if the species to be collected is monoecious (male and female reproductive parts on the same plant) or dioecious (male and female reproductive parts on different plants). If the species is dioecious (Inset 10.14), such as willow or cottonwood, an attempt to collect cuttings from both male and female plants in equal amounts should be made. If one of the objectives for using dioecious species is to promote or restore a species, donor plants must be located during periods of identifiable phenology, which is typically spring through summer. This might add an additional year to the timeline. To help preserve genetic integrity, it is recommended to collect from a minimum of 50 donor individuals within a watershed (See Chapter 6 for genetic transfer guidelines). Differentiating between individual plants within an area can be difficult with clonal species, such as willows and cottonwoods, because what often appear as a group of individual plants are actually offshoots from a single parent plant.
Diameter Size — The project objectives will determine which stem diameters must be collected (NRCS 1997). This must be assessed when a collection site is evaluated.
Small diameter. Small diameter materials, called branched cuttings, average less than 1.0 inch in diameter and are derived from the fine branches of vigorously growing donor plants. This material is tied into long bundles to form live fascines (See Section 10.3.3.4, Live Fascines) or laid on the surface of the soil to form brush mattresses. Live fascines are placed in shallow trenches on slope contours to function like small water and sediment collection dams, or they are placed at an angle to the slope to facilitate slope drainage (See Section 10.3.3.3, Live Brush Layers). Small diameter materials are also used for branch packing and to vegetate geogrids and rock gabions. Additionally, small diameter materials are used for rooted cutting production at nurseries. The typical diameter size preferred by most nurseries ranges from 3/8 to 1/2 inch.
Medium diameter. Medium diameter cutting materials are used to make live stakes (See Section 10.3.3.2, Live Stakes), which range in size from 1.0 to 3.0 inches in diameter. Stakes are tamped into the ground at right angles to the soil surface to secure small slumps, live fascines, and erosion control materials. Joint plantings are stakes that are driven between rocks or riprap, and must be greater than 1.5 inches in diameter and several feet long. Materials ranging from 0.5 to 2.5 inches are used to revegetate live crib walls. Crib wall cuttings must be long enough to reach 4 to 6 feet back to the end of the wall.
Large diameter. Larger diameter materials are used as dormant post plantings to stabilize streambanks. The diameter of these poles range from 3 to 5 inches and are 7 to 9 feet long. Large posts are not always easy to obtain in the wild, but can be produced from nursery stooling beds.
Cutting Footage — The total length of cuttings available for harvest should be estimated for each potential cutting area. This can be roughly calculated by evaluating 10 to 20 donor plants and estimating the average length and number of usable stems (by diameter size categories) that could be obtained from each. The average length is then multiplied by the estimated number of plants in the cutting area to obtain a total estimated cutting footage. This will be the high end of an estimate, since most landowners are likely to place a restriction on the amount of cuttings that can be harvested at one time. For example, a landowner might limit the amount of cuttings that can be taken from an area to 25% in a riparian area. The cutting footage would be 25% of the total length of the cuttings.
10.2.2.4 Determine Rooting Potential
Not all cuttings will root and become established plants when installed on a project site. The success rate of those that actually do become plants is dependent on 1) the percentage of cuttings that form roots when placed in an ideal growing environment, or the rooting potential and 2) the percentage of viable cuttings (those that root) that become established after a growing season, or the survival potential.
Rooting potential is analogous to germination rates obtained from seed testing. Seed tests are performed under uniform, ideal growing conditions, and are a measure of the potential of seeds to germinate (See Sections 10.2.1, 10.2.4, and 10.3.1). Rooting potential is similar to germination in that it assesses the potential of cutting materials to produce roots under an ideal rooting environment. The potential of cutting materials to initiate roots is the basis for determining how many cuttings to collect and the density to plant. For example, if the rooting potential of a specific collection is low, more cuttings will need to be planted at closer spacing to compensate for those cuttings that do not root.
Root potential tests have been developed for measuring the viability of nursery-produced plants (Ritchie 1985), but there are no standardized tests for determining the rooting potential of cuttings. Labs that offer seedling quality tests might, on request, use or adapt the root growth potential (RGP) tests developed for seedlings to assess the rooting potential of vegetative materials. Inset 10.15 gives one possible method for assessing rooting potential.
Rooting potential is affected by several plant factors, the most important of which are 1) species, 2) genotype, 3) date of collection, 4) portion of plant collected, 5) age of material, 6) condition of material, 7) preparation techniques.
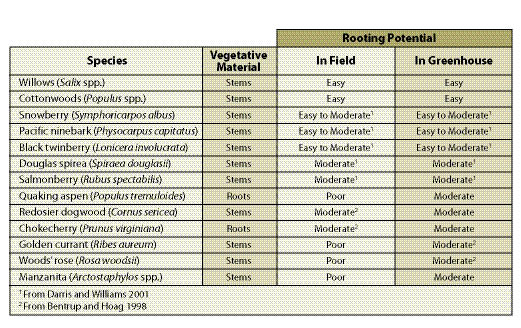
Species — A small percentage of species in the western United States root consistently from cuttings. Those that root well can be cut and used directly on revegetation projects. Other species initiate roots only under controlled nursery environments, and must be grown into rooted cuttings before they can be planted on a project site. A list of commonly used native species that root from cuttings are shown in Table 10.13.
Genotypes — Within each species, there is variability in rooting potential. Some donor plants (genotypes) will have greater rooting potential than other plants. Unless tests are run, it is hard to know which donor plants are optimal rooters.
Date of Collection — The optimal time to collect cutting material is during plant dormancy. For most willow and cottonwood species, this period extends from mid-fall, after the donor plant drops its leaves, to bud swell in late winter to early spring. It is safe to assume that if donor plants have lost their leaves, cuttings will be at their highest rooting potential.
Planting unrooted cuttings within the dormancy period is not always possible because most construction work is curtailed during winter months. If unrooted cuttings must be planted outside the dormancy period, establishment rates will significantly decrease. There are several alternative measures that can be taken: 1) collect cuttings during dormancy and keep in cold storage until they can be installed (See Section 10.2.2.7), 2) collect cuttings outside the dormancy period and plant more cuttings to compensate for the anticipated downfall (See Section 10.2.2.5), or 3) use rooted cuttings in lieu of unrooted cuttings (See Section 10.2.2.4).
| Table 10.13 — Some common species that can be propagated from vegetative material. |
 |
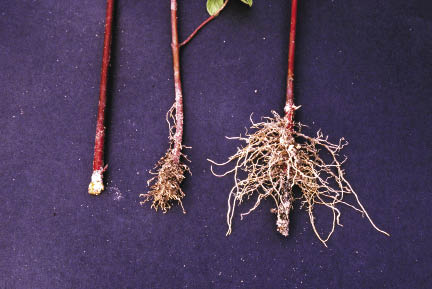
Collecting plant materials outside the dormancy period has been tried in biotechnical engineering projects with varying degrees of success (Figure 10.55). Species that root easily, such as willows (Salix spp).and cottonwoods (Populus spp.), will root from cuttings collected outside dormancy, albeit at very low rates (Steinfeld 2002; Steinfeld 2005). In some instances however, this may be the only option available to the revegetation specialist. When these are the circumstances, collecting outside the dormancy period should be done with an understanding of how establishment rates will be affected and whether the overall project objectives will be met. For large projects, it is important to conduct rooting and survival potential tests (Inset 10.15) several years before cuttings are installed so that the appropriate amount of cuttings can be collected and planting densities can be determined (See Section 10.2.2.5). An alternative to dealing with low survival potential of wild cuttings is to establish stooling beds (See Section 10.2.5).
Portion of Plant — Most cuttings are taken from stems and branches. However, the rooting potential for some species is greatest when cuttings are taken from roots (Table 10.13).
Age of Material — The rooting potential changes with the age of the donor plant. Many species have greater rooting potential from new growth, while others perform better when materials are collected from older branches or stems. Species having a higher rooting potential in the older portions of the plant make excellent live stakes because the size of the material is often large enough to withstand being driven into the ground (Darris and Williams 2001).
Condition of Material — Vegetative material from donor plants can be affected by insects and disease which can severely reduce rooting potential (See Section 10.2.5 for more discussion).
Preparation Techniques — Several practices can potentially enhance rooting potential. One method involves soaking dormant cuttings in water prior to planting. Schaff and others (2002) found that soaking black willow (Salix nigra) for up to 10 days in water doubled the survival rates of large diameter, dormant cuttings over unsoaked cuttings. Some revegetation specialists have reported an increase in rooting potential of cuttings collected outside the dormancy period by stripping leaves from stems, while others have found this ineffective (Steinfeld 2002). Soaking cuttings in hormones can increase rooting in some species (Shaw 2004), while it can be detrimental to others (Darris and Williams 2001). Testing rooting treatments on a small scale through rooting potential tests should be conducted prior to applying these methods on a larger scale.
10.2.2.5 Determine Survival Potential
Not all cuttings that initiate roots under ideal testing conditions will establish into plants when outplanted on a project site. The percentage of viable cuttings that root and survive one year after planting is called the survival potential. The survival potential is controlled by 1) climate, 2) soils, 3) planting methods, and 4) maintenance practices for each project. It can be determined though field testing conducted prior to installing cuttings, or estimated from previous field experience on similar sites using unrooted cuttings, rooted cuttings, or planted seedlings.
Climate — Survival potential is strongly influenced by the water loss potential of the site (See Section 5.4). Sites with low moisture stress during root initiation (typically spring through early summer) will have high survival potentials. The longer cuttings can initiate and grow roots without being under moisture stress, the greater the potential for survival. Climates with high humidity during root initiation occur in riparian areas.
Within a project area, survival potential often changes with aspect. Cuttings subjected to hot, dry conditions of south aspects typically will have a lower survival potential than north aspects. Survival potential also increases in areas that have occasional summer rainstorms that wet the soil profile.
Soils — Survival potential is affected by soil water storage and accessibility (See Section 5.3). Soils with low water-holding capacity will have lower survival potentials than those with high water-holding capacity. Installation of cuttings on compacted soils will result in lower survival than loose or tilled soils. Areas that have high water tables during the growing season, such as slumps, seeps, and springs, will have higher survival potentials for riparian species.
Installation Methods — Compensations can be made for sites with poor soils or dry climates. One option is to install longer cuttings. Studies have shown that higher survival rates and greater vegetative growth can be achieved with longer cuttings (Rossi 1999). This is especially important on drier sites, since longer cuttings access deeper soil moisture. Cuttings up to 2 feet in length have been shown to produce better survival and growth on harsher sites (McElroy and Dawson 1986; Rossi 1999). In areas where freeze-thaw potential is high (See Section 5.6.2), shorter cuttings have a greater likelihood of being pushed out of the ground before they can form roots to anchor them in place. Survival rates are also affected by the quality of planting methods. For instance there can be a significant decrease in survival when cuttings are planted without good soil—to-stem contact and many large air pockets. Section 10.3.3 covers the different methods of installing cuttings.
Plant Maintenance — Survival potential can also be increased if the plants are maintained during the first year after planting, including the control of competing vegetation and protection from animal browse (See Section 10.4, Post Installation Care of Plant Materials).
10.2.2.6 Determine Cutting Needs
Once the survival and rooting potentials have been determined, the quantity of cuttings to collect can be calculated. The information needed for determining cutting quantities and cutting spacing (density) is:
- Rooting potential,
- Survival potential,
- Target plant density,
- Area to plant,
- Desired established plant densities, and
- Length of cuttings.
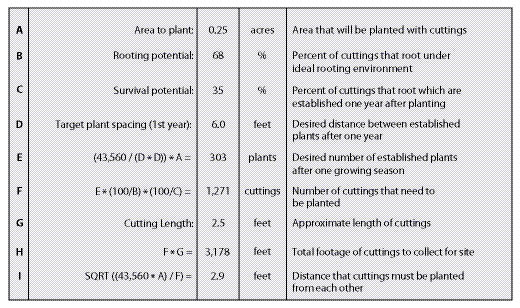
An example of how to calculate cutting quantities and planting spacing is shown in Figure 10.56. In this example, the project objective is to stabilize the slope by installing willow stakes. In the short term, this practice will increase slope stability by physically "pinning" the surface soil. The primary benefit to slope stability, however, will develop over time as the roots of the establishing willows begin to tie the soil particles together and increase soil strength. The desired spacing between established plants is 6 ft. When inventories are taken one year after planting, they should find an established plant approximately every 6 feet (D), or approximately 303 established plants for the entire planting site (E).
To achieve the desired density of established plants, we must determine how many cuttings to plant and the average spacing between installed cuttings. This determination is based primarily on the rooting and survival potentials (See Section 10.2.2.4 and Section 10.2.2.5). In this example, the rooting potential was 68% based on rooting potential tests. The survival factor was estimated to be around 35% from previous experiences on similar sites. These factors are used in the equation shown in Line F, to calculate the number of cuttings needed to install. To obtain 303 established plants, it would be necessary to install approximately 1,271 cuttings. This is approximately four times the number of established plants. It is necessary to install this many to compensate for the number of cuttings that either do not root, or root and do not survive the summer. The planting spacing is calculated using the equation in Line I. Cuttings must be installed at half the distance of the desired established plant spacing. Since the site conditions in this example are harsh, the cuttings will need to be planted deeply to access soil moisture. For this reason, the cutting lengths are approximately 2.5 ft. Multiplying 2.5 ft by the number of cuttings needed (F) gives the total length of cuttings that must be collected (H). Knowing that 3,178 ft of cuttings are needed, the number and location of cutting areas can be selected from a cutting area map, and a contract can be developed.
| Figure 10.56 — This spreadsheet can be used to calculate the number of cuttings to collect and how close to plant them on the project site. |
 |
10.2.2.7 Long-Term Storage
If cuttings are not installed immediately, long-term storage will be required. Cuttings collected in the fall or winter and stored until the following spring or summer must be held in refrigerated units. The optimum temperatures for long-term storage range between 28 to 31 °F. Freezing temperatures prevent disease and curtail respiration, thereby increasing cutting viability. If freezing is not possible, then storing cuttings at temperatures between 33 and 35 °F should maintain cutting viability for several months.
For long-term storage, cuttings should be relatively free of leaves and other material that might mold in storage. They must be packaged in plastic or storage bags so they will not dry out. Cuttings should not be wrapped in moist burlap or placed in plastic bags, especially if cuttings are not frozen. Diseases could potentially develop that will rot the stems.
10.2.2.8 Develop and Administer Contracts
A good plan that includes the location of cutting sites and how the cuttings will be treated, transported, and stored will be the basis for the development of a collection contract. The contract must specify:
Cutting Locations — A map or GPS locations must identify cutting areas and specify an estimated range of cutting quantities (See Section 10.2.2.3). If the contractor elects to collect from other areas, then these areas must be approved prior to cutting. For each cutting area, the percentage of the donor population that can be collected should be specified. Typically this is no greater than 25% of the population.
Dates of Collection — The contract must specify a period of time that cuttings must be collected (See Section 10.2.2.4). Collecting outside this time period must be discussed in advance with the revegetation specialist.
| Figure 10.57 — A forest reproductive material identification tag should be filled out and attached to each bundle of cutting material. |
|
Collection Size, Lengths, and Quantities — Quantities must be specified for each size category. For example, if material is to be used for stakes, then a specification might require 200 stakes, 18 inches long, with a range of diameters between 1.0 inch to 3.0 inches.
Collection Methods — The contract should identify how the contractor will collect the cuttings. For example, it should state how the contractor will identify which end of a stake is basal and which is terminal. This is typically done by cutting the basal end of each stake at an angle. The contract should also specify how the cuttings will be packaged or bundled. Contracts often call for all stakes to be aligned with basal ends of the cuttings in the same direction. Bundle sizes or weights must be specified. The bundles must be light enough to transport by one person (45 lb or less). The contract must also state that the bundles must be securely tied or bundled together for hand transportation.
Source Identification — Each bundle must be identified with a Forest Reproductive Materials Identification Tag (Figure 10.57), which specifies the species, collection location, elevation, and date of collection.
Special Treatments — Special measures such as soaking must be stated in the contract. If soaking is required, then the location of the soaking area must be identified on a map (See Section 10.2.2.4).
Temporary Storage and Transportation — The contractor must address how cuttings will be temporarily stored when the weather is warm or dry. Cuttings must not be allowed to dry out once they are collected. Temporarily storing in shaded areas covered by plastic sheets or wet burlap are acceptable methods. Delivery of cuttings must be done in a manner that does not allow the cuttings to dry. Closed transportation or covering with plastic for long distances should be considered.
10.2.3 Collecting Wild Plants
10.2.3.1 Introduction
Wild seedlings, commonly referred to as wildlings, are indigenous plants growing in their native habitat (Therrell and others 2006). They are naturally reproduced outside of a nursery situation, but can be transplanted directly into a restoration site or into a nursery for culturing and future use.
The collection and use of wildlings in native plant restoration can be a viable alternative to direct seeding, nursery seedlings, or rooted cuttings. As with wild cutting collections (See Section 10.2.2), wildlings can be used in situations where it is difficult or impossible to collect or use seeds for plant production because : 1) the plant either does not produce seeds or produces seeds very infrequently; 2) seeds are often unfilled or non-viable; 3) seeds have a very narrow collection window; 4) seeds have already dispersed prior to collection planning; and 5) insects or animals are a problem with collection (Priadjati and others 2001; St John and others 2003). Unlike cuttings, they can be available immediately with little to no transport costs, and no direct nursery costs, if used within the same time frame of collection.
There are several advantages to using wildlings in restoration plantings. Large wildlings provide "vertical relief" (visual prominence) more quickly to a site than other methods, and, depending on the species and environment, will establish and spread quickly (Hoag 2003). Use of wildlings reduces the risk of introducing non-native organisms such as weeds and pathogens (Therrell and others 2006). If reproduction of the plant is more successful via rhizomes (e.g., sedges), transplanting wildlings may be the most efficient and effective method for reestablishing these species (Steed and DeWald 2003). In addition, if plant propagation is difficult from seeds or rooted cuttings, use of whole plants may be the only alternative for a particular species.
Transplanting of wildling plants, however, can be unsuccessful for a number of reasons. Wildlings are often growing in stressful conditions, and do not recover from transplanting shock as quickly as cultivated seedlings. Wildlings often have smaller, coarser root systems than cultivated seedlings, or heavier taproots which are not easily removed from soil in their entirety (St John and others 2003). Successful transplanting requires experience, skill, proper handling, ideal temporary storage, and proper care of the plant both before and after transplanting.
10.2.3.2 Develop Timeline
Although wildling plants may provide an opportunity for quick establishment of larger plants on restoration sites, several factors must be considered in the planning process which could impact their availability. Suitable locations that can provide the number of plants required must be determined. If large quantities of plants are necessary, several years may be required to identify these locations. Once sites are identified, 1 or 2 seasons of plant preparation prior to removal, transport, and transplanting may be required (See Section 10.2.3.5).
Wildling plants may be removed from their native site and either transplanted immediately or transported to a nursery, potted, and cultured for future outplanting. Transplanting following removal may occur if the plant source is undisturbed areas outside the restoration site. If plants are removed prior to site disturbance, or if additional time is needed for production of sturdy plants, culturing in a nursery for some specified period of time may be necessary. Lead time of 1 to 2 years may be necessary for nursery-assisted wildlings, depending on the situation. This lead time may include contract procurement and administration for both collection and nursery culturing.
10.2.3.3 Locate Wildling Collection Areas
Potential sources for wildling plants can be identified through field surveys during the vegetative assessment phase (See Chapter 6). Sites should be located on maps and both plants and sites should be assessed for the following traits:
Accessibility — Handling of wildling plants during removal and transport is a critical factor in ensuring survival. Roots may require protection if the rootball is not totally contained in soil; or plants may be heavy if the rootball is intact. Therefore, it is necessary that collection sites be accessible by roads. Since most collections will be taken in fall or early spring, it is also necessary to determine whether or not road conditions at these times of year will preclude collection.
The best collection areas may not always be found within the project site, so large areas surrounding the project may need to be surveyed for plants. Costs will increase substantially if it is necessary to transport plants for long distances.
Land Ownership — Permission to remove plants must always be obtained from either the private landowner or public land management agency. In addition, any required permits should be obtained from state or federal agencies to ensure compliance with regulations (Hoag 2003).
Viability — If possible, areas of healthy forest or rangeland areas should be designated as collection sites (Priadjati and others 2001). Sites should contain healthy, vigorous, and adequately sized material with a minimum number of unhealthy plants (St John and others 2003). Stunted needles, off-color foliage, and poor annual growth are indications of stress plants that should not be collected. Plants should only be removed from sites that show good regeneration over the area (Hoag 2003). Determining the viability of the collection material and timing of use (See Section 10.2.3.4) should be completed prior to selection of the collection site. It is important to transplant wildlings into similar growing environments. For instance plants growing under shade should be placed back into a shaded environment to achieve optimum viability.
Genetics — One of the disadvantages or limitations of using wildlings, or any form of asexual propagation, in restoration is the potential to restrict the genetic diversity of the plant population. As adequate population sampling is important to maintain this diversity, it may be advisable to identify several sites over a large area from which to collect (St John 2003). Collecting many plants over a large area will help capture both inherited and environmental variation. However, sites must be chosen carefully so that they are reasonably similar.
Prior to collection, it is necessary to determine whether species are monoecious (male and female reproductive structures on the same plant) or dioecious (male and female reproductive structures on different plants). If the species of interest is dioecious, both male and female plants will need to be collected in somewhat equal proportions. If one of the objectives for using dioecious species is to promote, restore, or increase species, then target plants must be located during a period when reproductive phenology is evident, which is typically spring through summer.
10.2.3.4 Determine Transplanting Versus Nursery Culture
Although cost may be the biggest deciding factor in whether wildlings are collected for immediate transplant or growing in a nursery, other factors should enter into the decision in the restoration plan.
Timing — Wildling plants should be transplanted into their new location as quickly as possible. If plants are to be collected from sites outside the disturbed area, these can potentially be removed and transplanted to the restoration site within the same time frame. However, if plant removal is part of a salvage operation, where plants are located within the area of disturbance, then plants could be transported to a nursery or similar growing situation. Plants should be transplanted into pots and maintained until the appropriate outplanting season.
Species — Some plant species may be more successful than others for direct transplanting from one site to another. Plants that spread underground or with stolons will perform well, although dry, compacted sites will slow the rate of spread significantly (Therrell 2006). Species that recover quickly from root damage, such as willows (Salix spp).and cottonwoods (Populus spp.), will also perform well when large plants are needed quickly. These types of plants may lend themselves easily to transplanting within the same time frame as removal.
Plants with taproots, such as conifers and many shrubs, and plants with long, brittle horizontal roots, such as heather or vine maple, are difficult to transplant. Special care must be taken during removal to extract as much of the roots as possible. To ensure a higher success rate, further culturing in an optimal environment following removal may provide a healthier, more viable plant for outplanting.
Size and Availability — If wildling plants of the target species are plentiful and appropriately sized on undisturbed sites, immediate transplant during the appropriate season is feasible. However, if available wildlings are smaller than desired, an additional 1 or 2 years of nursery culture may provide a better plant for colonization of the site.
Certain plants have the ability to root by layering, such as pinemat manzanita (Arctostaphylos nevadensis). If entire plants are not plentiful, portions of individual plants can be removed and cultured in a nursery situation for outplanting the following year.
10.2.3.5 Collection and Handling
Date of Collection and Timing of Transplanting — The season during which collection and transplanting occur has been shown to dramatically affect the survival and growth of wildling plants (Yetka and Galatowitsch 1999). Plants allocate carbohydrates and nutrients during various phases of phenological development. Different levels of tolerance to transplanting stress during the year are the result of physiological needs shifting among shoot and root growth, flowering and seed production, and storage. In addition, seasonal variation in environmental factors, such as soil moisture and temperature, can affect planting establishment (Steed and DeWald 2003).
Timing of collection will depend on whether the wildlings are to be transplanted in the same time frame or cultured in a nursery. If wildlings are to be transplanted into the restoration site following collection, the chances for survival will increase for most species if operations occur in winter to early spring. The seedlings are dormant during this period and can handle the stresses associated with transplanting. There is also less chance of damaging new roots that occur during the spring and fall. In addition, planting early extends the period for root growth prior to soil-drying in summer.
Collection could occur in either fall or spring if wildlings are to be cultured in a nursery. However, if plants are collected in the fall, care must be taken to avoid excessive root damage, since plants will not be dormant. Due to the perishable nature of wildlings, the timing of collection must be coordinated with the nursery to assure that the facilities, supplies, equipment, and labor are available following harvest (St John 2003). Once collected, plants should be transplanted immediately into containers.
Genetics — Collection of wildlings can consist of a single plant, a clump, or several pieces of a plant that have rooted through layering (NRCS 1997). A collection of individual plants should be large enough to assure adequate population sampling. A minimum of 50 plants within at least a range of 1 mile from the restoration site is recommended when possible.
Source Identification — Every collection must be identified with a Forest Reproductive Materials Identification Tag, which specifies the species, collection location, elevation, and date of collection (See Figure 10.53 in Section 10.2.1, or Figure 10.57 in Section 10.2.2).
| Figure 10.59 — Be sure to select small plants with a protective ball of soil around the roots (A). Do not attempt to transplant plants if the soil falls off the root system (B). | A.
|
B.
|
Quality and Size — Only healthy, turgid, moderately vigorous, and adequately sized wildlings should be collected for either transplanting or nursery culturing. Unhealthy or stressed plants should be avoided.
Although species dependent, successful transplanting typically increases as plant size decreases (St John 2003). Transplanting of large shrubs and trees is usually unsuccessful. Their root-to-shoot ratio is unbalanced, and these plants often do not recover from or survive transplanting shock. Transplanting of larger willows, sedges, or herbaceous material into riparian zones, however, may be appropriate depending on the vegetative competition and other establishment conditions (Hoag 2003; Steed and DeWald 2003).
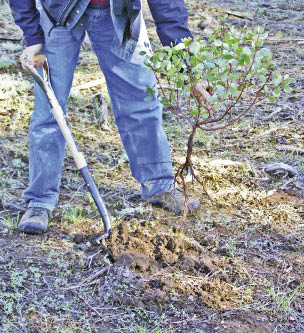
Handling, Transport, and Storage — Collection of wildling plants will be most successful if the soil is moist during plant removal. If precipitation has not occurred, irrigation prior to lifting would be desirable. Removal and transplanting should only occur in the mornings on cool, cloudy days, when the plant is fully turgid.
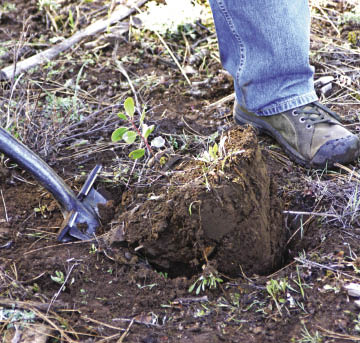
A tile spade or similar flat-bladed shovel is the best tool for small to medium plant removal. Using the "dripline" of the plant as a guide, make shovel cuts with the blade as perpendicular to the surface of the ground as possible, since maintaining an intact ball of soil around the roots is important (Figure 10.59). Root morphology should also be considered in this process. Roots growing in deep soils or arid soils will tend to grow down rather than out. Roots growing in shallow soils will tend to spread, requiring a much larger area of disturbance (Therrell 2006).
The shovel, as well as hands, can be used to lift the root ball gently out of the hole while attempting to keep the root ball intact. Hand pruners can be used to cut away woody roots that do not come free with the shovel. The root ball can then be transferred to a suitable container (large bucket, pot, burlap, or plastic bag) for transport to the transplanting site (Therrell 2006). If wildlings are to be transported to a nursery, plants should be placed in plastic bags in coolers. Plastic bags should also contain moistened towels or similar material if roots are not covered with soil.
| Figure 10.60 — Plants can be excavated from the soil using the drip line (dashed lines) as a guide. |
 |
A tree spade can be used if larger plants are to be excavated and transplanted (Figure 10.60). The factors important for using a tree spade are: 1) the terrain is accessible to the tree spade equipment (slope gradients no greater than 20%), 2) soils are relatively free of cobble size rock fragment, and 3) soils are moist. In this operation, planting holes are created first, then plants are excavated, moved, and replanted. The size of the plant to be transplanted depends on the soil volume that can be removed by the tree spade. Typically plants up to 6 feet tall can be transplanted with success. Taller trees should be irrigated into the soil to improve survival. Using a backhoe has also been successful in transplanting large willow clumps (Hoag 2003).
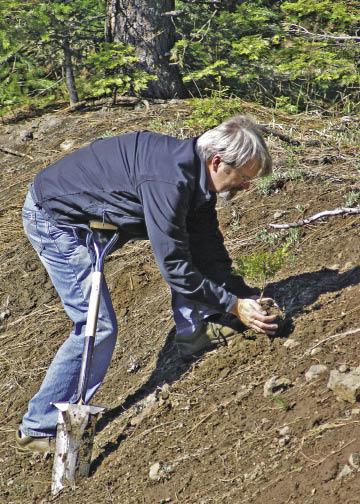
Wildlings should be transplanted into their new location as quickly as possible, with minimal to no storage time. All vegetative material must be kept cool and moist during the process. If wildlings are transported to a nursery, the plants should be kept in a cooler and transplanted into pots within 1 to 2 days of collection.
10.2.3.6 Survival Potential
As with rooted cuttings (See Section 10.2.2.5), not all wildlings will become established and thrive following transplanting. Survival is controlled by climate, soils, planting methods, and maintenance practices on the project.
Climate — Water loss potential (See Section 5.4) is probably the main determining factor for survival on many sites in the western United States. Sites with low moisture stress during root initiation (spring through early summer), and sites that have the potential for longer root initiation periods, will have higher survival.
Within a project area, aspect can also affect root initiation and survival. Transplanted wildlings subjected to hot, dry conditions on southern aspects have a lower potential for survival than those on cooler northern aspects.
Soils — Survival of wildlings is affected by soil water storage and accessibility (See Section 5.3). Soils with low water-holding capacity or compacted soils will have lower survival than those with high water-holding capacity and greater porosity.
Planting Methods — Good transplanting techniques will improve the survival rates of wildlings significantly. Planting methods are the same for wildlings and nursery-grown seedlings. Common mistakes include planting too shallow or too deep, planting too loosely, damaging roots by exposing them to air, or failing to place root systems properly (Therrell 2006).
Ideally, transplanting should occur on a cool, cloudy day. Planting holes should not be allowed to stand empty for an extended period of time, as soil will dry rapidly. When possible, microsites should be used (rocks, logs, depressions, and so on) to provide protection from the sun or wind.
Plant Maintenance — Survival potential can also be increased if the plants are maintained during the first year after planting. Practices including the control of competing vegetation and protection from animal browse. For large wildlings, irrigation during the summer will improve survival. Also large wildlings might need additional support depending on such site conditions as wind and snow.
| Figure 10.62 — Transplant wildlings immediately following collection to minimize moisture stress. |
 |
10.2.3.7 Develop and Administer Contracts
A plan that includes the location of collection sites, and how the wildlings will be handled, transported, transplanted, and stored (for short periods of time) will be the basis for the development of a collection contract. The contract must specify:
- Collection Locations. A map or GPS locations must identify wildling collection areas and specify a range of quantities that can be expected. If the contractor elects to collect from other areas, then these areas must be approved prior to collection. For each collection area, it should be specified what percentage of the natural population can be collected.
- Dates of Collection. The contract must specify a period of time that the collections can be made (See Section 10.2.3.5). Collecting outside of this time period must be discussed in advance with the revegetation specialist.
- Collection Quality and Size. Minimum and maximum plant sizes should be specified in the contract. In addition, specifications for health and vigor should be included.
- Collection, Handling, and Storage Methods. The contract should identify how the collections will be made, how the wildlings will be handled and processed following removal, and how wildlings will be temporarily stored prior to transplant or transport to the nursery.
The contractor must address how plants will be temporarily stored when the weather is warm or dry. Wildlings must not be allow to dry out once they are collected. See Section 10.2.3.5 for proper handling and storage methods.
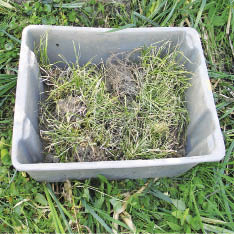
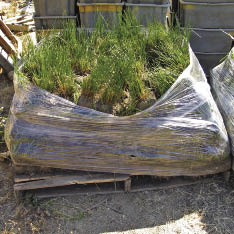
10.2.4 Nursery Seed Production
10.2.4.1 Introduction
Most revegetation projects require large quantities of source-identified seed. The most common approach to obtaining such quantities is to issue seed increase contracts. In these contracts stands of grasses and forbs are established from source-identified seed (typically wild seed collections) and cultured specifically to produce seed (Figure 10.63). Usually the seeds are produced by the end of the first or second year of production.
Considering the costs and amounts of seeds that can be obtained from wild seed collection, propagating grass and forb seed is very efficient. For example, mountain brome (Bromus carinatus) requires 8 pounds of wild seed to sow an acre of seed fields. At the end of the first year, the seed collected from the field will average 800 pounds, a hundred-fold increase. For most species grown in production beds for two years, the return is at least 50 pounds of seed produced for every pound of wild seed collected and sown. In some cases 100 pounds are collected per pound of wild seed sown. This section will outline the steps required for developing and administering seed increase contracts.

10.2.4.2 Develop Timeline
Seed production varies by species but typically it takes three years to obtain seed. This involves one year to obtain seed from wild collections, and at least two years for seed production (Figure 10.64). There are a series of steps or tasks that are required to obtain seed that will be discussed in detail in this section:
- Determine seed needs,
- Obtain starter seed,
- Develop and award contract,
- Administer contract, and
- Store seed.
Early in the planning phase a rough approximation of the quantity of needed seed for each species must be determined. Seed quantities will be refined as planning progresses, but because of the amount of time that is takes for wild seed collection and seed production, it is important to make an estimate early in the planning stages. Developing and awarding wild seed collection contracts is the first task and this can take several months (See Section 10.2.4). To avoid missing the seed collection window, these contracts must be awarded by early spring, otherwise an additional year will be needed for wild seed collection.
| Figure 10.64 — Up to three years should be allowed when obtaining nursery grown seed because of the time it takes to obtain wild collected seed and obtaining seed from seed producers. |
 |
Seed production contracts should be awarded by mid-July for fall sowing and late January for spring sowing. It is important to prepare and award seed increase contracts well in advance of sowing to allow the contractor enough time to prepare and sow their fields. Specific sowing dates will differ for each seed producer because of differences in geographic location, climate, or experience. Some growers may want to certify the seed, so this may require additional preparation time as well. It is beneficial to contact the potential growers prior to award of contracts to find out when sowing and first harvests are expected. Once wild seed has been collected, cleaned, and tested, it is delivered to the seed producers.
Seed increase contracts should cover a span of at least two years, to account for the possibility of a low first year harvest. Seed harvests take place during the summer and seed cleaning in the fall of each year. Once seed has been cleaned, the grower submits a sample from each seedlot to a seed laboratory for testing. Seed testing typically takes place in the fall and is completed in several months. Seed is placed into seed storage until it is needed. For many revegetation projects, the seed that is harvested in the summer is needed for immediate fall sowing. This can be accomplished if those seedlots are put on a "fast track" for seed cleaning and testing. The seed production contract should state those seedlots that need to be ready for early fall sowing.
10.2.4.3 Determine Seed Needs
Determining total seed quantities for a revegetation project must be done as soon in the planning process as is feasible since wild seed collection contracts and seed propagation contracts are based on these figures. At this point, only a rough approximation of seed needs is required.
Calculating the needed quantities of seed is performed for every species that will be used on a revegetation project. Each species requires a set of data which must be estimated since specific seed data is unavailable at this point in planning. The information that is needed includes an estimate of the following factors:
- Pure live seeds per pound,
- Field survival,
- Target seedling density,
- Target species composition, and
- Area to seed.
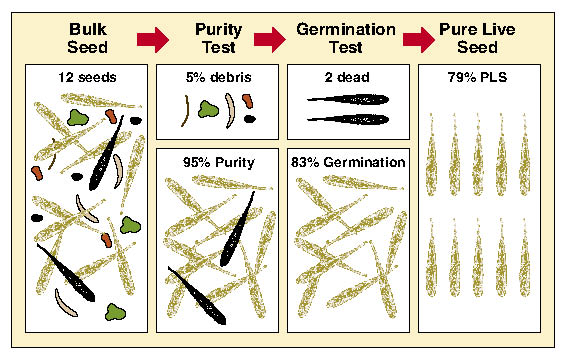
Pure Live Seeds Per Pound (PLS/lb) — The quality of seedlots can vary greatly. One method to assess seed quality is to calculate % pure live seed (PLS). This value represents the percent of the gross seed weight composed of viable seeds. For example, if a seed producer did not clean the harvested seed of a seedlot very thoroughly, the PLS would be low because there would be a lot of additional weight associated with non-seed debris. Seedlots that were cleaned well, on the other hand, would have a higher PLS because the debris weight would have been removed. Seedlots that have higher germination rates also have higher PLS. These two factors, % purity and % germination, when multiplied together and divided by 100, give the pure live seed (PLS) of a seedlot. The concept of PLS is illustrated in Figure 10.65. In this example, purity of a grass seedlot is 95% and germination is 83% which results in a PLS of 79%.
Another example of calculating PLS/lb is shown in Figure 10.66 for western pearly everlasting (Anaphalis margaritacea). For this seedlot the estimated purity is 60% which indicates that over half of the gross weight of seed is actually viable seed and the remaining part is either debris or non-viable seed. Multiplying this value by the percent of seeds per pound and by the percent of germination will yield the number of viable seeds per pound. In this example, the number of seeds in a pound of a western pearly everlasting seedlot is tested at 8,000,000. Multiplied by 60% purity and 85% germination gives a value of approximately 4,080,000 PLS per pound of bulk seed. This value can be used in sowing calculations as shown in the example. Keep in mind that for each additional seedlot in a mix, similar calculations will have to be made. Estimates for purity, germination, and seeds per pound can be obtained from Table 10.14, seed inventories, or seed extractory managers.
Field Survival — Field survival factors account for the viable seeds that, for one reason or another, do not grow into plants within the year after seeding. It accounts for viable seeds that did not germinate because of the harsh site conditions, or did germinate but could not survive the site. The field survival factor reflects the harshness of the site. For example, seeds that are sown under mulch on a moist, cool site will survive better than seeds sown on hot, dry sites without mulch, in which case the survival factor would be much lower. Only an estimate of field survival can be made at this time, based on general understanding of the site (See Section 10.3.1.5 for more discussion on estimating survival). Choosing a survival factor between 3% (poor site conditions and poor seeding practices) and 25% (good site conditions and practices) should be sufficient for this estimate. In Figure 10.66, the field survival was set very low because of the harshness of the site.
![Figure 10.66 - Determining the quantity of seed that will be needed for a revegetation project can be made by completing this spreadsheet for each species. The estimated pounds of seed determined for each species can be the basis for ordering seed through a seed increase contract. This example calculates the quantity of western pearly everlasting (Anaphalis margaritacea [ANMA]) seeds needed for a project.](/images/learn/fig_10_2_4_4.jpg)

Target Seedling Density — The target first year density indicates the number of plants/square foot that is desired one year after sowing. This is the target number of seedlings, for all species sown, in a one square foot area. Seedling densities range from a target of less than one plant per square foot for shrub and tree species to 10 and 25 seedlings per square foot for grasses and forbs (See Section 10.3.1.5).
Target Species Composition — The target composition defines the percent of established plants that are made up of each sown species. For example, if three species are sown, the target composition of plants might be 50% species A, 35% species B and 15% species C. The target species composition is developed from reviewing field surveys of disturbed and undisturbed reference sites. In the example shown in Figure 10.66, only 10 percent of the composition of plants is targeted to be pearly everlasting.
Area to Seed — This is the total area that is planned to be revegetated from seed based on the estimated acres presented in the preliminary road plans.
In the example shown in Figure 10.66, the seed needs for pearly everlasting is calculated to be approximately 22 pounds for the entire 25 acre project. This might seem like a very low amount of seed for a project of this size, but it reflects the high live seeds per pound for this species.
10.2.4.4 Obtain Starter Seed
Once the seed needs for a project are determined then the next step is to obtain starter seed to supply to the seed producer. Seed furnished to the seed producer must be of high quality and tested for purity, germination (or TZ), seeds per pound, and noxious weed content (See Section 10.2.1.7 for seed testing). Seedlots with high weed content will produce weedy fields. It is very expensive to weed non-target species out of seed production fields or clean non-target seeds from harvested seedlots, so it is important to give seed producers only the highest quality seed. It is worth the investment of sending all wild seed collections to a seed extractory to be cleaned prior to sending to the seed producer. Section 10.2.1.3 discusses how to determine how much wild seed to collect for starting seed production crops.
There will be some projects where not enough wild seed is collected to establish a seed crop through seed sowing. In these cases, small collections of seed can still be used by first sowing seed in small plugs (1 to 2 cubic inch size) at a nursery, then transplanting the plugs into a seed production field at low densities (<1 seedling per foot). Not only will this reduce the amount of seed needed to establish a seedbed but seed production from these beds is often greater because plants are evenly spaced.
10.2.4.5 Develop Contract
Inset 10.16 — Source Identified Straw Bales A secondary product from the seed production contracts is the straw that remains after harvest. This material can be used for erosion control or seed covering. It can be used as a mulch and has the additional advantage of being a source of unharvested viable seed. This product must be treated similarly to certified straw sources (See Section 10.1.3). There should be no noxious or undesirable weed seed in the bales. A visit to the seed production fields prior to seed harvest will indicate if there are any unwanted species that will be present in the hay bales. Bales of each seedlot must be kept separate from other sources to prevent mixing. If straw bales are stored for any length of time, they must be protected from rain.  |
The seed production contract must state for each seedlot being grown:
- Seedlot ID,
- Years each seedlot will be in production,
- Minimum annual seed yields for each seedlot, and
- Minimum purity and germination rates.
Minimum annual seed yields and average germination and purity rates can be obtained from Table 10.14. The years that a seedlot will be in production will vary by species and lead-time (See Section 10.2.1.2 for further discussion).
In addition, the seed production contract must address what is required or expected of the contractor in respect to the following criteria:
- Seed production experience;
- Timelines;
- History of production fields;
- Location of other seed crops;
- Irrigation system;
- Culturing practices;
- Control measures for non-target species;
- Seed harvest methods;
- Seed cleaning, packaging, and labeling; and
- Seed testing.
The response to these criteria becomes the basis for selection of contractors.
Seed Production Experience — Seed production is a specialized form of agriculture requiring different growing strategies and equipment. While many seed producers have transitioned in seed production easily, it still requires several years of experience to understand how to efficiently grow native seed. Many seed producers who have moved into growing native seed have previous experience growing vegetable or commercial grass seed. These seed producers bring great experience and perspective to the native seed industry. Seed producers who have had little experience growing seed, often start small with "easier" species (i.e., workhorse species) to gain experience. It is important to know the capability of each seed producer, and make frequent site visits. Those with a long history of good seed production can be contracted for species that are more difficult or have not been grown before. It is good to request production records, as well as seed tests, to include species, seed yields, seed quality, and clients served by the producer.
Seed Production Timelines — Seed producers are located in many parts of the western United States, covering a range of climates affecting when seeds are sown and harvested. It is important to know the general growing schedule of each seed producer to determine when you will need to supply starter seed to the seed producer and when the first shipment of harvested seed can be expected. Seed producers from east of the Cascade Mountains might need starter seed in the middle of the summer for an August sow, while those west of the Cascades might not need it until early fall. Some seed producers wait until the spring to sow seed crops, in which case the seed harvest in the first year may be significantly reduced. Depending on the climate, seed harvests occur as early as May to as late as August. It is important to specify a date in the contract when seed will be delivered, especially if you plan on using the seed in the same year it is harvested.
History of Production Fields — Every field will have some amount of residue seeds from previous crops which will germinate along with the starter seed. Knowing the history of the fields during the planning stages helps determine whether these non-crop plants pose a problem for the seed production. Noxious weeds or undesirable non-native species are obviously a real concern, but many of these species can be roughed out of the seed beds prior to harvesting. Of more concern are fields where the same native species, but from a different seed source, were grown. For example, a field is being prepared for sowing California fescue (Festuca californica) from a seed source in the Blue Mountains of northeastern Oregon. The field had previously grown California fescue from a seedlot collected west of the Cascades. Since seed from the previous fescue crop would germinate in the same bed, the resulting crop would include both seedlots. Since the plants from these seedlots would appear almost identical, it would be impossible to weed out the plants that came from the previous crop. Even species in the same genera are difficult to distinguish by untrained weeders and cannot be weeded out of beds.
Fields that previously produced seed from the same or similar appearing species should be evaluated for the risk of seed contamination from previous seed crops. There are measures seed producers can take to reduce contamination risks. These include growing non-seed crops for several years between seed crops, rotating between grass and forb seed production (forb seed is easy to discern from grass seed), and fumigating between seed crops. These strategies must be discussed with the seed producers.
Location of Other Seedlots — Equally important to the history of seed production fields, is the location of adjacent seed crops of the same species. If seedlots of the same species are being grown close by, the risk of cross-pollination between crops increases and the genetic integrity of the proposed seed crop would potentially be compromised. There can even be cross-pollination between similar species. For example, blue wildrye (Elymus glaucus), bottlebrush squirreltail (Elymus elymoides), and bluebunch wheatgrass (Pseudoroegneria spicata) are known to cross-pollinate. Talk to a local botanist or geneticist about which species can potentially cross breed. Seed crops that can cross-pollinate should also be separated by a minimum isolation distance. Under most circumstances, the isolation distances should be in accordance with State Certification Standards (certified class). These standards can be found at the departments of agriculture for each state.
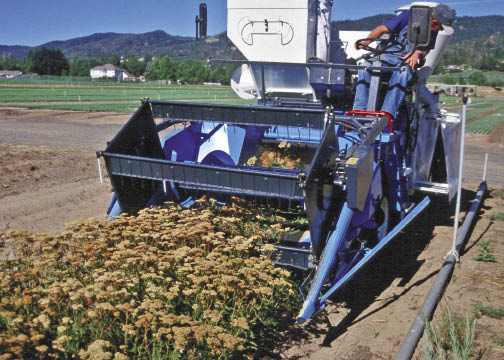
Irrigation System — Many native species must be grown under irrigation to meet the quantities of seed specified in the contract. Seed producers that have minimal or no irrigation capacity are often unlikely to meet seed production requirements and time frames. Only those species that do not require irrigation should be offered to growers lacking irrigation systems.
Culturing Practices — A review of the culturing practices, which include irrigation, fertilization, disease, and insect control, should be done to determine whether they are appropriate for the production of the species being grown. Culturing practices are often written up in propagation protocols that can be found at http://www.nativeplantnetwork.org.
Control Measures for Non-Target Species — Specific attention must be given to how weeds and other non-crop species will be controlled. Typical measures include 1) the use of herbicides prior to sowing and after the crop has been established, and 2) hand weeding of non-target species. The most important period of weed control is just prior to seed harvest because of the importance of eliminating potential non-target seed before seed harvest.
Seed Harvest Methods — Most seed harvests are carried out with specialized equipment that detaches seed from the stock, separates it from plant and soil debris, and collects it into storage containers (Figure 10.67). It is important to know the seed harvesting equipment that will be used for each species and how it will be cleaned between seedlot crops to prevent the possibility of seed contamination.
Species with indeterminate inflorescences (seeds that ripen on the seed stock all summer long) must be hand collected more than once in the summer. Periodic seed harvests of these species must be planned so that the full range of seed can be collected. The seed producer should address how these species will be harvested to obtain the maximum seed yield.
Seed Cleaning, Packaging, and Labeling — After seed is harvested, it must be dried and further cleaned. Seeds are air dried (Figure 10.68) or placed in a forced air drying system. Seeds are then extracted and cleaned. Awns and flower parts are removed and dirt, stems, and other debris are separated from the bulk seed. Understanding the cleaning operation is important because viable seeds can be damaged or discarded during this process.
Dry cleaned seed should be packaged in "breathable" woven poly bags at uniform weights. Industry standards are 25 or 50 lb bags. Bags of seed must be clearly identified (labeled by stencil or permanent marking pens, with characters at least 1 inch in size) with the Government's source seedlot identification. In addition, all bags should have an affixed tag stating the species name (scientific and common), seedlot identification, % germination, % purity (including other crop seed, weed seed, and noxious weeds), date of seed test, and seed producer's name. Additional labeling information may be requested, such as project name, National Forest or BLM office, or seed owner name.
Seed Testing and Acceptance — The contract must state the minimum acceptable standards for each species and seedlot. Acceptance and payment should be based on meeting the standards set for:
- Germination,
- Purity,
- Weeds, and
- Moisture content.
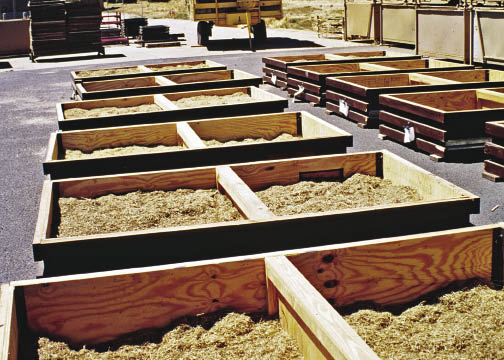
Seed testing is typically the responsibility of the contractor. Seed samples used for testing and contract performance must be taken by a certification agency representative or the contract inspector. Samples must be tested by a state certified seed laboratory (See Section 10.2.1.7). Seed test results must be identified by the seed source identification and task order number. Test results must be satisfactory to the Government before final acceptance of the seed is made.
Establishing minimum germination and purity rates can be based on averages obtained from commonly produced species shown in Table 10.14 or through discussion with seed extractory managers. The contract should address what actions the contractor can take to increase either germination or purity, if these rates fall below the standards. Lower purity rates can be accepted if seed will be used in a hydroseeder (See Section 10.3.2). A tetrazolium test (TZ) may be made in lieu of a germination test for a seed viability test depending on time constraints and species involved. All-State Noxious Weed examinations are required and if any of these species are present, then the seedlot is either rejected or recleaned. Seed moisture test must also be conducted and seed must not exceed 10% moisture.
10.2.4.6 Administer Contract
Seed producers are required to maintain adequate records to allow the Government to monitor contract progress. Records should include information and dates of field preparation, seed sowing, field treatments, fertilization, seed harvest, cleaning, storage, seed yields, and any other activity relating to seed production. It is a good practice to make contact either by phone or by visiting the seed producers two to three times a year to go over the progress of the contract. The best time of year for field visits is just prior to or during seed harvest. A visit or phone contact in fall is important to discuss the potential of keeping seedlots additional years. Unless it is stated in the contract, seedlots are likely to be plowed under once the seed orders have been met. Visiting in the late summer or fall is also a good time to observe the seed extraction and cleaning processes.
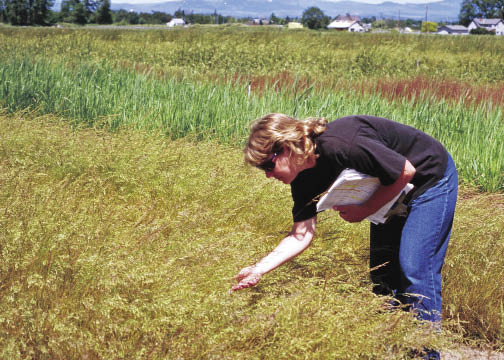
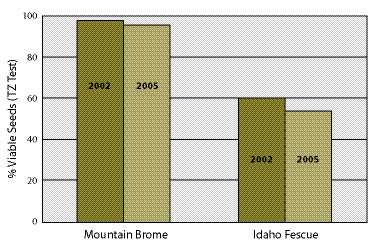
During these visits, it is important to note the condition of the seedlots and how they are being identified throughout the process; are there clear labels stating the seedlot identification in the field, during drying, extraction, and storage? Are seed harvest and extraction equipment being thoroughly cleaned between seedlots or are there remnant seeds remaining in the equipment that can contaminate the next seedlot being processed? Note the condition of the fields prior to seed harvest; are the fields weedy and will there be a final weeding before harvest? Are seeds being handled with care or are they roughly handled?
A good working relationship with the seed producer is essential in meeting the overall seed increase objectives. It should be realized that some factors, such as weather, are beyond the control of seed producers, and on some years seed harvests will fall short of the minimum amounts stated in the contract. Good communications with the seed producer will alert you to crop failures or fall down in orders as soon as they occur so that alternative measures can be taken. An inventory of the number of acres in each seedlot and the condition of the crop should be supplied by the contractor upon request.
10.2.4.7 Store Seed
Seeds can remain viable in storage for many years after harvest. How well seeds keep depends on the moisture content of the seed, the quality of the seed being stored, and the storage conditions (temperature and humidity). Riley (2006) found that there was minimal reduction of seed viability in granary storage after three years for mountain brome (Bromus marginatus) and Idaho fescue (Festuca idahoensis) (Figure 10.70). Seeds typically store poorly when seed quality is low or seed moisture content is above 10 percent. If seedlots are stored for more than a couple of years, it is important to periodically test the seed for germination.
Granary Storage — Most seedlots are stored for short periods of time before they are used on projects (usually less than five years). For this reason, granary storage is the most common and economical form of seed storage. Granary storage unit are enclosed rooms sheltered from rainfall and temperature extremes. They are typically insulated and protected from rodent and insects. Many granary storage units are tree coolers that have been reconfigured for this use. While seedlots can store for long periods, low quality seed should be used first because it is more likely that this seed will loose viability in storage, than high quality seed.
Freezer Storage — Freezer storage is usually reserved for seedlots that will be stored for many years. Conifer and shrub seeds as well as forb and grass wild seed collections are usually stored under these conditions, whereas bulk grass and forb seeds typically are not.
10.2.5 Nursery Cutting Production
10.2.5.1 Introduction
Obtaining cutting materials in the wild for restoration and bioengineering applications can be a difficult and expensive task, especially if populations of parent material are small or access is limited. Native plant nurseries can be an alternative source of a variety of woody cuttings. Understanding how nurseries establish and manage "stooling beds" can be a great help to revegetation specialists and project engineers.
10.2.5.2 What are Stooling Beds?
"Mother plants" are established in nurseries for the sole purpose of providing a ready source of cuttings. Stooling beds are hedge-like rows of mother plants that are established in bareroot nurseries or in vacant fields adjacent to container nurseries (Figure 10.71A).
Stooling beds take advantage of the ability of many broadleaved woody plants to sprout profusely from the base after being cut off just above the root crown. Plants remain in the juvenile state, which means they have a higher tendency to sprout and produce roots. Once stooling beds are established, annual cutting ensures that juvenility can be prolonged indefinitely.
Stooling beds allow the efficient collection of dormant hardwood cuttings during the winter when it may be difficult or impossible to make field collections (Figure 10.71B). Because they are located at nurseries, the beds can be irrigated and cultured; processing and storing the cuttings is also much more efficient and cost-effective. Stooling beds have several advantages over wild collected cuttings.
Maintaining Genetic and Sexual Diversity — It is much easier to correctly identify different plant species and ecotypes from labeled stooling beds as compared to wild collections. For example, willows often grow together along streams and can be difficult to identify during the winter dormant season. Stooling beds offer the ability to produce a large number of cuttings of unique species or ecotypes quickly and easily.
Many government nurseries have established stooling beds of the species and ecotypes that are adapted to their local area and can thus be a potential source of cutting material for private growers or revegetation specialists. Private native plant nurseries are also establishing stooling beds of desirable species for their local areas, and several are specializing in riparian and wetland species. For specific revegetation projects, however, the odds of a nursery having existing stooling beds of the proper species and local ecotype are low. Therefore, collecting cuttings and establishing stooling beds should be done early in the planning process so a good supply of cuttings will be available when needed.
Some plants, such as willows and cottonwoods, are either male or female, which can create a serious problem in restoration (Landis and others 2003). If a balanced mixture of male and female plants is not collected from the project site, the resultant stooling beds will not produce both male and female cuttings. When working with dioecious plants, the sexual identity of potential mother plants must be determined prior to collection (See Section 10.2.2, Collecting Wild Cuttings).
| Figure 10.71 — Stooling beds (A) are an efficient way of ensuring that a ready supply of hardwood cuttings of the proper species and source are available (B). | |
A.
|
B.
|
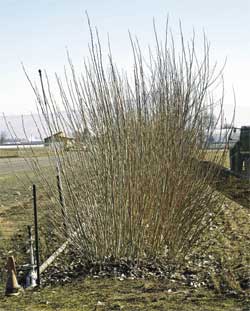
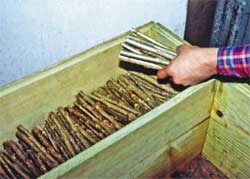
Producing Healthy and Vigorous Cuttings — One of the most practical advantages of establishing stooling beds in nurseries is that the cuttings are often healthier and more vigorous than those collected from the project site. Willows are host to many insects and fungal pests, such as galls and cankers (Figure 10.72). They are also subject to animal browsing. These factors can significantly lower the quality of wild-collected cuttings. For example, on a riparian restoration project in Idaho, cuttings were collected from heavily browsed willows on the project site and then planted in nursery beds to produce rooted cuttings. The yield of shippable plants was low and these wild-collected cuttings rooted poorly (<50%) when outplanted. These failures increased production costs and threatened the project's replanting schedule. Subsequently, about 150 rooted cuttings from the first nursery crop were used to start a stooling bed. The following year, harvesting just half of the stooling bed yielded more than 6,000 healthy cuttings. Cuttings from the stooling beds rooted at over 99%, thereby lowering establishment costs and keeping the project on schedule (Dumroese and others 1998).
Reducing Costs — It might seem that collecting cuttings in the wild would be the least expensive means of obtaining cutting materials. This is not necessarily the case. Inefficiencies of driving to remote locations, pulling cutting materials to road ways, using make-shift cutting practices, and working under severe winter conditions all add up to high costs per cutting.
10.2.5.3 Select Species Suitable for Stooling Beds
Poplars, cottonwoods, and willows are the species most often used in stooling beds. It should not be assumed, however, that all species of the willow family are good candidates for stooling beds. Some species have growth characteristics that reduce their potential. For example, trials at the Colorado State Forest Service Nursery in Fort Collins have shown that narrowleaf cottonwood (Populus angustifolia) and narrowleaf willow (Salix exigua) do not "stool" well and must be propagated by other methods (Grubb 2007).
| Figure 10.72 — Stooling beds can be cultured to prevent the occurrence of insect galls (A) and fungus cankers, such as Cytospora spp (B). | |
A.
|
B.
|
B.
|
|
There is great potential for using other woody species that have the propensity to sprout and form roots easily. For example, redosier dogwood (Cornus sericea) is commonly grown in stooling blocks and used as a source of cuttings for restoration sites. Outplanting success is higher than with wild cuttings collected on the project site, and has ranged from 50% to 90% (Hoag 2007). In North Dakota, twinberry honeysuckle (Lonicera involucrata) is being investigated (Morgenson 2007). Native species that root easily from hardwood cuttings have the potential to be grown in stooling beds to generate cuttings. Species that have inherent deep seed dormancy characteristics, such as snowberry, honeysuckle, elderberry, and some species of currants, could be more easily propagated in the nursery using stooling beds than sowing seeds to produce seedlings. Species that have consistently low seed viability, such as mock orange and ninebark (Physocarpus spp.), may also be produced more economically in stooling beds.
The Plant Materials Centers of the USDA Natural Resources Conservation Service identified the potential of a wide variety of woody native plants that would be suitable for stooling beds (Table 10.15). For example, Crowder and Darris (1999) discuss which plants are suitable in the Pacific Northwest and provide a wealth of information on the installation and culture of stooling beds.
Darris (2002) performed extensive greenhouse and field trials to test the potential of several woody plants for live stake applications. Common snowberry (Symphoricarpos albus), salmonberry (Rubus spectabilis), Pacific ninebark (Physocarpus capitatus), and twinberry honeysuckle (Lonicera involucrata) have proven to be effective as live stakes for soil bioengineering in the Pacific Northwest. Notably, several have proven to be superior to willow on some sites, such as salmonberry in wet, shaded environments and snowberry on drier, exposed locations.
10.2.5.4 Select the Type of Cutting Material
Several different types of cutting materials can be collected from stooling beds. Nurseries use small propagation cuttings to start their own bareroot or container plants. Stooling beds can also provide several types of unrooted cuttings used in restoration (Figure 10.73).
Live Stakes — Live stakes are so named because, in addition to providing stability on restoration sites, they are expected to root and sprout after installation (See Section 10.3.3.2, Live Stakes). Because they are often pounded into the ground, live stakes are cut from relatively straight sections of second- or third-year wood. Live stakes are typically 18 to 24 inches in length and from 1 to 3 inches in diameter (Figure 10.73A). Depending on the plant species, it can take 2 to 4 years for a stooling bed to produce large enough branches for live stakes. Some of the smaller willow species will never grow large enough.
Branched Cuttings — Bioengineering practices, such as live fascines, vertical bundles, brush layers, and pole drains (See Section 10.3.3.3, Live Brush Layers and Section 10.3.3.4, Live Fascines) require a large number of branched hardwood cuttings (Hoag and Landis 2001). The size of this material ranges from 0.5 to 2 inches in stem diameter and 4 to 15 feet in length (Figure 10.73B). Stooling beds may take 2 or more years to produce significant numbers of harvestable branched cuttings.
Pole Cuttings — Pole cuttings (Figure 10.73C) are large diameter (3- to 6-inch) main stems that have all side branches with the top 1 to 2 feet of stem removed. They are used in restoration projects where stability is a main concern. Because of the large size of the plant material necessary for pole cuttings, nursery stooling beds are ideal. Larger trees, such as cottonwoods and tree-sized willows (e.g., Goodding's willow [Salix gooddingii]), have primarily been used for pole cuttings. Other large woody plants with the potential to sprout may also prove to be viable material (Dreesen and Harrington 1997).
10.2.5.5 Develop Timeline
Obtaining cutting materials from established stooling beds takes between 1 and 5 years, depending on the type of material. A minimum of one year is necessary to produce branched cuttings; 2 to 4 years to produce live stakes; and pole cutting may require over 4 years (Figure 10.74). In the planning stages of the revegetation project, the number, type, and species of cuttings needed for the project must be determined. Procedures for making these calculations are outlined in Section 10.2.2.6, Determine Cutting Needs. Nurseries or government facilities that specialize in stooling bed production must be contacted to see if they will establish stooling beds for your project. The managers of these facilities will inform you of costs and the time frame for meeting your orders. While there will be some cutting materials produced in the first year, full production of stooling beds does not happen until several years after installation.
Most stooling beds are started from cuttings taken from the wild. The sources of starter material must be located in the field during the summer or fall prior to installation of the beds. The sexual identity of dioecious plants must be determined during the appropriate season prior to collection. Section 10.2.2.3, Locate Cutting Areas, gives an outline of the steps necessary to obtain starter material. The nursery managers will tell you the number of feet of starter material, the quality of the wild collections (age, size, condition), and packaging and shipping methods necessary to meet the order. Wild cuttings are collected when the leaves are off the plants. Depending on the climate of the site, collections can begin in mid to late fall and end from late winter to mid spring. Wild cuttings are usually sent immediately to the nursery where they are prepared for installing in stooling beds. Most stooling beds are started directly from cuttings that are stuck in the spring. Cuttings root quickly in the spring and, with irrigation and fertilization, grow into large plants by the end of the summer. The following winter, the beds are ready for harvest. Since stooling beds are relatively uniform, the material can be harvested and processed in a production-oriented manner. Cutting materials are cut to your specifications and stored in either freezer or cold storage facilities until you request delivery.
Developing stooling beds is a long-term investment. While they often take several years to fully establish, stooling beds can remain productive for many years depending on species, ecotype, nursery cultural practices, and pest management. For cottonwoods, stooling beds typically remain productive for 4 to 8 years, after which vigor and productivity start to decline. However, other nurseries have maintained stooling beds of willow and cottonwood for 12 to 15 years without decreases in vigor. Cytospora canker, caused by fungi of the genus Cytospora spp (Figure 10.72B), is a particularly serious pest of all Salicaceae and, because it is transmitted and thrives in wounded stem tissue, can ruin a productive stooling bed. The productivity and longevity of a stooling bed is a direct function of the amount of care given them. Since stooling beds are an investment with long-term payoffs, finding local partners (watershed councils, Forest Service, BLM, state and county land managers), who can utilize these beds after the needs of your project have been met can be a service to the local community.
10.2.6 Nursery Plant Production
10.2.6.1 Introduction
Woody plants are critically important because they quickly provide vertical structure and aesthetic relief on roadside revegetation projects. When planted within areas seeded with grasses and forbs, trees and shrubs provide the essential matrix of a successful revegetation project. Direct seeding is rarely used to establish woody plants on restoration projects because they are often slow to germinate and take several years to become established. Depending on site characteristics, many sizes of nursery stock can be used, but large plants are favored by revegetation specialists because they establish quickly and dominate the site. Their physical size and deep roots allow them to quickly access deep soil moisture, and their expansive root systems help stabilize soils. In addition to providing wind protection and shade to lower growing vegetation, trees and large shrubs provide habitat for insects, birds, and other animals and can greatly accelerate the development of a sustainable plant community.
| Figure 10.75 — Steps 2 through 4 of the Target Plant Concept are very useful when ordering nursery stock (adapted from Landis and Dumroese 2006). | 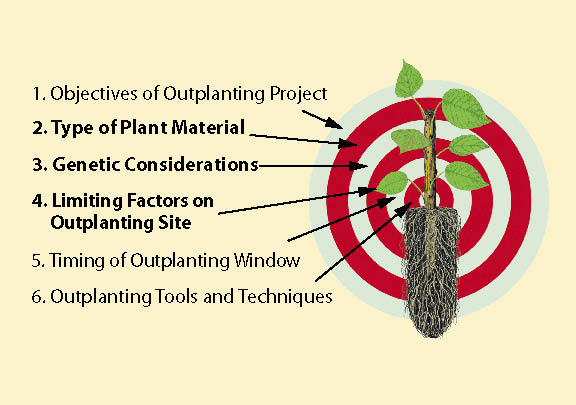 |
Grasses and forbs establish quickly and easily from seeds, so they are not commonly grown in nurseries. However, nursery stock is warranted under certain circumstances:
- Sufficient quantities of grass and forb seeds are rare or hard to collect.
- Increasing grass and forb seeds by seed growers is difficult or excessively expensive.
- Establishing grasses and forbs is difficult on some sites.
- Restoring threatened or sensitive species is a high priority.
- Nursery stock is more effective in restoring wetlands.
- Installing nursery stock is the best and fastest way to achieve a desired plant composition.
- Aggressive weeds are a serious problem.
This guide outlines the steps needed to obtain quality seedlings, transplants, or rooted cuttings from native plant nurseries. Typically, it takes one to two years to grow nursery plants, so the revegetation specialist must develop growing contracts and establish timelines several years in advance.
10.2.6.2 The Target Plant Approach
The target plant concept (Figure 10.75) is one method to optimize the use of native plant materials to ensure successful revegetation of the site. The first two steps in the process were covered during planning (See Section 6.4). Consideration of the plant material that would best meet the project objectives for a given site may lead to the decision to use nursery stock. Nursery stocktype, genetic considerations, and site factors limiting to plant establishment must then be discussed prior to ordering nursery plant materials. These 3 topics will be covered in detail in the following sections. Outplanting windows and outplanting techniques will be discussed in Section 10.3.4, Installing Plants.
Stocktype — The term "stocktype" refers to the various products that a native plant nursery can provide (Inset 10.17). In a broad sense, it includes seeds, which are discussed in Section 10.2.4. The oldest nursery stocktypes are bareroot seedlings and transplants. However, container plants are usually most suitable for roadside revegetation projects. Container nurseries are currently producing a wide variety of stocktypes that include seedlings, transplants, and rooted cuttings. Although project objectives and planting site characteristics should be primary considerations, the choice of container stocktype is more often defined by price. The price of container stock is based on the cost of materials and, more important, nursery production space and time. A unit area of greenhouse bench space or outdoor growing compound is a fixed cost, but the number of months or years to grow the plants to shippable size add to the stock price. Although selling prices for each container stocktype are set by tradition and market factors, older and larger plants will cost more.
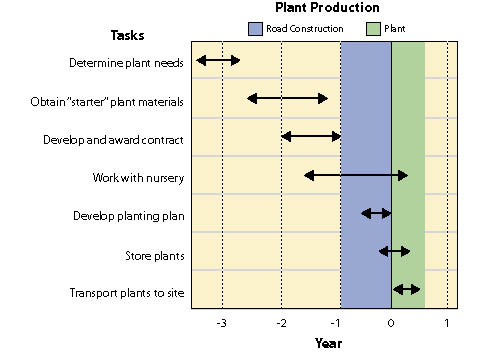
Genetic Considerations — Genetics are a key factor in the target plant concept (Figure 10.75), and two factors must be considered: local adaptation, and genetic and sexual diversity.
"Seed source" is an idea familiar to all foresters and restoration specialists. Plants are adapted to local conditions. If native species can be propagated from seeds, these seeds should always be collected within the local "seed zone." The seed zone is a three-dimensional geographic area that is relatively similar in climate and soil type.
Seed source affects plant establishment through growth rate and cold tolerance. In general, plants grown from seeds collected from higher latitudes or elevations will grow slower but tend to be more cold hardy during the winter than those grown from seeds from lower elevations or more southern latitudes (St Clair and Johnson 2003). The majority of seed zone research has focused on conifers in the Pacific Northwest. The same concepts can apply to other native species. Nurseries sow and culture plants according to seed zones. It would therefore be prudent to use nursery seedlings or cuttings from the same geographic zone and elevation in which it will be outplanted.
Target plants should also represent the genetic and sexual diversity present on the outplanting site. To maximize genetic diversity in the nursery plants, seeds and cuttings should be collected from as many different plants as possible. Cuttings must be collected near the outplanting site to assure they are properly adapted. Additional considerations are necessary for dioecious plants, such as Salix spp. and Populus spp., because all progeny produced by vegetative propagation will have the same sex as the source plant. Therefore, when collecting cuttings at the project site, care must be taken to ensure that male and female plants are equally represented.
Of course, collecting costs must be kept within reason, so the number of seeds or cuttings collected must be a compromise. Guinon (1993) provides an excellent discussion of all factors involved in preserving biodiversity when collecting seeds or cuttings, and suggests a general guideline of 50 to 100 donor plants.
Site Limiting Factors — The fourth aspect of the target plant concept (Figure 10.75) is based on the ecological "principle of limiting factors," which states that any biological process will be limited by that factor present in the least amount. Each planting site must be evaluated to identify the environmental factors most limiting to plant survival and growth (See Chapter 5) as this information is critical to deciding on the proper nursery stocktype. Large container trees with a deep root system typically survive better and establish faster, but woody shrubs and other plants in smaller containers can fill other needs.
Restoration sites pose interesting challenges when evaluating limiting factors. Road construction or decommission typically creates compacted soils that have been severely altered in texture, stability, nutrient status, and so on from their natural state.
In addition to challenging physical soil characteristics, the biological component of roadside planting sites has been severely altered or even destroyed. A variety of mitigating measures may be necessary prior to outplanting. Beneficial soil microorganisms, such as mycorrhizal fungi and nitrogen-fixing bacteria, provide their host plants with many benefits including better water and mineral nutrient uptake. Plants destined for these sites should be inoculated with the appropriate symbiont before outplanting (See Section 10.1.7 for a complete discussion).
10.2.6.3 Develop Timelines
Obtaining some nursery stocktypes can take a considerable amount of lead time and planning. Although most native plant nurseries carry a wide variety of species, it is unlikely they would have plants that are genetically suitable for a specific project. Therefore, "source-identified" native plants must usually be grown by contract. The large nursery stocktypes that will survive and grow on challenging restoration sites typically require several years (Figure 10.76). It is therefore necessary to develop contracts that will assure that the correct genetic material is being propagated and that the resulting plants are of the highest quality that will survive and grow when planted on the revegetation site.
Project plant needs are determined early in the revegetation planning stages, including the number of plants, types of species, and size of plants. From the list of species, seed sources or "starter" plant material sources are located from suppliers or collected in the wild. This can typically take at least a year. Several years before the construction site is ready for planting, a contract for growing plants is developed and awarded. Once awarded, seeds and "starter" plant materials are sent to the nursery so that sowing, transplanting, or sticking can begin promptly.
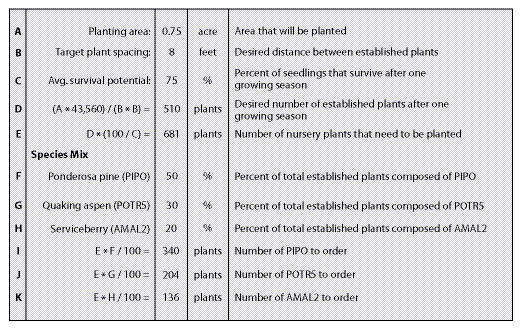
The growing time for large container stock can extend from 1 to 2 years, depending on the species. The nursery will take a final seedling inventory during the middle of the final growing season. At this time, a planting plan can be developed. Road construction will be moving into its final stage and the planting plan can be tailored to specific on-site conditions. Including lifting, storage, and transporting plant materials, the whole process, from start to finish, takes two to three years.
10.2.6.4 Determine Plant Needs
Early in the planning stages, a general idea of plant needs is developed based on the desired future condition for each revegetation unit. The information required to determine the quantities for each revegetation unit includes:
- Area to plant,
- Plant spacing (density),
- Survival potential, and
- Species mix.
Using calculations similar to those presented in Figure 10.77, an estimate of the number of seedlings to order from nurseries can be determined. Calculations should be performed for each revegetation unit, since species mix, plant spacing, and survival will change considerably between units.
Planting Area — Summarize the acreage of all planting areas within each revegetation unit.
Target Plant Spacing — The target plant spacing is the desired distance between established plants. The spacing or density of established plants is an estimate that should be based on the site productivity and project objectives. A review of the reference sites can be a guide to determining the densities and species mix a site will support. Be sure to note how the different plant species are naturally spaced on each reference site. Some grasses and forbs exhibit uniform spacing but many woody plants have a more random or clumped pattern (See Figure 10.119 in Section 10.3.4, Installing Plants, for more discussion).
For example, an undisturbed reference site description shows that an average density for an established stand of trees is 500 trees/ac, with a species mix of 80% ponderosa pine and 20% quaking aspen (Density can be converted to plant spacing by taking the square root of 43,560 divided by plants per acre).The selection of species often determines the planting densities. Shrubs, for instance, grow at much closer spacing than trees, and this should be taken into consideration when species mixes are determined for a revegetation unit.
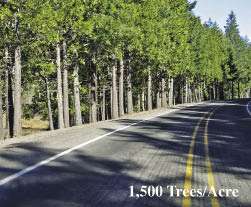
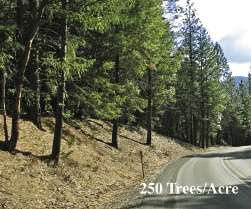
Revegetation unit objectives often require higher plant densities than typically occur on reference sites. Quick visual screening as the overriding objective will require high-density planting. Selecting a higher plant density than typically occurs in the project area should be done with some projection of how the area will appear many years later. High-density planting can create overstocked stands of trees within ten or twenty years of planting (Figure 10.78). Overly dense stands often lead to stressed trees and high fire hazard conditions, and might require some thinning at a later in time.
Survival Potential — The survival potential is an estimate of the percentage of planted seedlings that will survive and become established. There are many factors that determine how well nursery-grown plants will survive after outplanting. Factors that you can control include:
- Selection of appropriate species and seed source for the site,
- Quality of nursery plants,
- Appropriate storage and transportation conditions, and
- Care in stock handling and planting.
High rates of plant mortality are usually due to an oversight or neglect of one or more of these factors. Projects with high plant mortality are an indication of poor planning or implementation; in other words, you have missed the mark on one of these factors. However, aiming for 100% survival is often unreasonable because of the high associated costs. Most projects should aim for a plant establishment rate of 85% to 90%, but plan for 75%.
Species Mix — Good survival and establishment of plants fundamentally rests on selecting the most appropriate species from locally adapted seed sources. Selecting the species mix for each revegetation unit should be based on an evaluation of disturbed and undisturbed reference site descriptions, which includes an understanding of the site limiting factors that will affect plant survival.
10.2.6.5 Select Stocktypes
Plants are grown, or cultured, in a variety of ways — indoors or outdoors, in native soil or artificial media, for several months or up to several years. The nursery industry defines how a plant is grown and its size, or morphology, in groups called "stocktypes." Although there is no standard terminology for describing the variety of possible stocktypes (Landis and others 1993), individual stocktypes can be defined by:
- Propagation environment (bareroot or container),
- Years in the nursery, and
- Size or shape of the container for container stock.
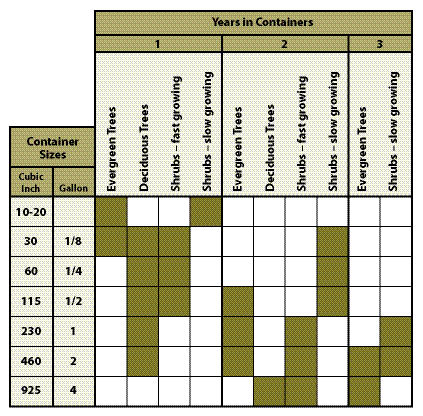
Propagation Environment — Plants are grown either in containers (container) or in native soil in open fields (bareroot). Bareroot stocktypes are harvested and packaged without soil around the roots, whereas the root systems of container plants are held together in a plug of rooting media. In many cases, container seedlings can be planted at any time of the year if appropriate planting methods are used. Bareroot seedlings, on the other hand, are typically lifted in the winter months and held in storage for several months, limiting the planting window from early winter through later spring. Container plants can be grown in large pots for more than two years to very large sizes. Bareroot plants are limited to the depth of the growing beds, which is typically less than 12 inches. Depending on the species, bareroot plants can usually be held in beds for only 1 to 2 years. While container plants have many advantages over bareroots, bareroot seedlings are often much less expensive to purchase and plant. However, for most roadside revegetation sites, we recommend container stock.
Container Size — The size and age of a nursery-grown plant is controlled by the size of the container. Typically, the larger the container, the larger the plant and the longer it takes for roots to fill the container. In Figure 10.79, plants are grouped into broad categories based on how fast they typically fill out various container sizes. Many deciduous tree species, which include willows, cottonwood, maples, alders, and ash, tend to be very fast growing species and can fill out a range of container sizes in just one growing season. Conifer species (firs, pines, cedars, and hemlocks) will fill smaller containers the first year and can be transplanted into larger containers for another one or two growing seasons. Faster-growing shrub species (ceanothus, bitterbrush, mountain mahogany) are often grown in small containers in the spring and transplanted into larger containers several months later. They will fill a 1/8 to 1/2 gallon in one growing season. Slower growing shrub species must remain in the smaller cells for a full growing season before transplanting.
Figure 10.80 — Nurseries can produce plants in all shapes and sizes. The best stocktype for your project will depend on site conditions and time and method of planting. |
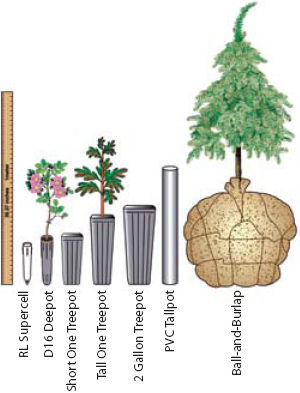 |
Container Design — Container shape is also an important consideration in stocktype selection because it determines how easily the root plug is extracted from a container, the degree of root spiraling, what planting methods are used, and ease of handling. The depth and taper of the container walls govern how easily a root plug can be extracted from its container. Generally, the greater the taper, the easier a root plug can be extracted from its container. Taper becomes more critical as container walls become longer with respect to the diameter of the opening. Straight-walled "tall pots," made from PVC pipe, are very long in comparison to the diameter of the opening. Root plugs from this container are difficult to extract without the placement of Vexar tubing inside the container. Pulling the Vexar tubing during extraction brings out the entire root plug without undue stress to the stem or root system. Other nurseries offer tall pots with the PVC pipe cut in half lengthwise and held together with electrical ties. Before planting, the ties are cut, which allows easy access to the root system.
Several container design features affect root development and plant quality. When plant roots grow out and hit the sides of the container, they often grow downward in a spiral pattern. When roots reach the bottom holes, they should "air prune." In poorly designed containers, the circling roots will eventually form a tight mesh which, after outplanting, can continue to circle and "strangle" the plant. Most containers have vertical ribs that guide roots down the sides of the container walls to prevent root spiraling. Some smaller containers feature copper coating on their walls to chemically prune the roots as they grow. Other container walls have vertical air slits which air prune the roots. When container roots are so cultured, the root system is more fibrous with more root tips.
Root condition is a critical factor to discuss at the time that growing contracts are being developed. Roots that have excessive spiral growth must be pruned before they are planted (See Figure 10.128 in Section 10.3.4). This is most easily done at the nursery during harvesting. This extra processing step must be stipulated in the growing contract.
Matching Nursery Plants to Outplanting Site — A wide variety of nursery stocktypes are available (Figure 10.80). Site factors should be considered before placing an order. The depth and width of containers are very important for seedling survival and growth. Sites with low precipitation during spring, summer, and fall should be planted with larger container sizes. Where soil moisture-holding capacities are low or vegetative competition for soil moisture is high, long containers should be considered. Where rock content is high and it is hard to excavate a planting hole, shorter container stocktypes should be used. Additional post-planting care must be implemented to compensate for shorter roots (See Section 10.3.4). The planting method dictates the size of the root plug. For instance, the expandable stinger and power augers require plug diameters no greater less than 4 inches. Large seedling stems and tops are required where animal damage is expected.
Stocktype selection often determines seedling survival rates and how fast they grow in the first years after planting. Typically the larger the root system, the better the survival and growth. Larger stocktypes cost more, so it is important to target the stocktype to the needs of the site and revegetation objectives. For instance, if quick establishment of vegetation for visual screening is an important objective, then a large stocktype would be ordered. On the other hand, if a revegetation unit is relatively unseen and the site has few limitations to plant survival, a small, less expensive stocktype would be ordered. While larger stocktypes are generally more expensive than smaller stocktypes, the total costs of establishing seedlings should be considered before settling on a smaller plant. Costs for replanting a site where smaller seedlings died in the first year can be far more expensive than planting larger plants in the first place.
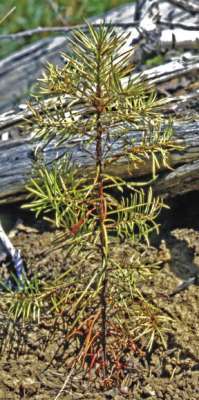
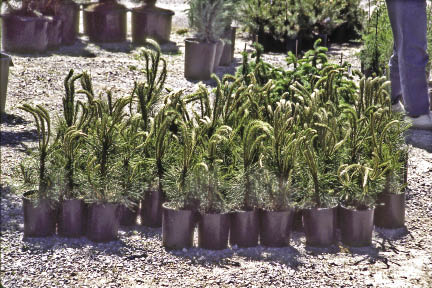
Years in the Nursery — Bareroot stocktypes are often defined by the years they are grown at the nursery, whereas container plants are typically described by the size of the container. This is important when ordering plants because many species take longer than one year to grow to the desired plant size. If plants are needed for a project within one year, the revegetation specialist will need to order smaller size containers to assure that the roots can fill the plug.
Unbalanced or Holdover Stock — A common mistake is growing container plants with tops larger than the root system can support. This is often the result of poor planning, delay of projects, or poor selection of stocktype. For example, road projects are frequently delayed for a year, leaving the revegetation specialist with the problem of what to do about the seedlings that are being grown. Typically under these circumstances the nursery manager is asked to hold the seedlings in the same containers an extra year. While most will comply, they will do it reluctantly. The result is plants that are "top heavy" — the shoots are too large for the root system to support (Figure 10.81A). The results are often deceiving. The plants have not shown stress because they have been pampered under greenhouse conditions and care. Yet, once seedlings are outplanted on a typical harsh site, it will be a struggle to grow enough roots to keep the tops healthy and alive. Plants respond to the lack of moisture in what is referred to as "transplant shock" (Figure 10.81B) by shutting down growth and often turning yellow or "chlorotic." Roadsides are stressful sites that require the very best quality plant material. A good example of the difference between well-balanced and poorly-balanced nursery stock is shown in Figure 10.82.
Delays are common in roadside projects, so two viable options can be considered: 1) transplant the stock into larger containers, 2) reject the plants and place a new order. Option one is appropriate if the plants are being grown in small containers and a larger container is available for transplanting. If you are growing plants in a large container, it makes little sense to transplant into a still larger one. This option is often more costly than option two, which is simply starting over with the order. But starting over assumes available seeds and other starter plant materials, and enough time to reorder. And what can be done with the plants that are not being used? You or the nursery manager can contact land managing agencies and landowners in the general geographic area to see if they are interested in these plants. If they are not, there are often watershed councils or environmental groups that would appreciate the donation for their projects.
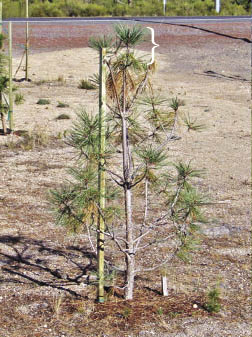
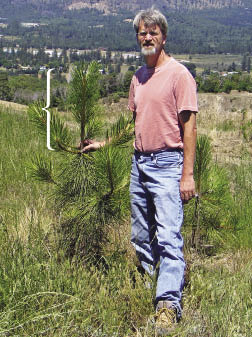
10.2.6.6 Obtain Seeds or Other Starter Plant Materials
Nursery-grown plants begin from source-identified seeds or other "starter" plant materials (cuttings, smaller seedlings for transplants) that must be supplied at the beginning of the contract (Figure 10.83). Since starter plant materials can take a year or more to obtain, it is important that these needs are identified early in planning, and collection contracts are put into place as soon as possible. Locally adapted seeds of some trees can take years to obtain because some species do not produce a crop every year. The benefits and drawbacks of each type of starter plant material are discussed below.
Seeds — Starting plants from seeds is usually the least expensive method of plant propagation and offers the greatest genetic diversity. The downside is that, for most species, seed propagation is slower than growing from cuttings or transplants. Crop production times will vary with species and nursery practices. Most woody plants take two to three years to grow into large plants from seeds and must be transplanted at least once. Other faster-growing species can reach shippable size in one growing season with good culture.
Seeds are either collected in the wild by seed collectors, or field-grown in an agricultural setting from tree and shrub seed orchards or from grass and forb seedbeds (See Section 10.2.4). Both wild-collected and field-grown seeds are sometimes available from federal seed extractories, federal nurseries, Forest Service district offices, or BLM resource areas. These agencies usually have tree seeds for most seed zones that cover federal lands, and often some selection of shrub, grass, and forb seeds are available. It is worth checking to see if these sources are available before you decide to collect seeds from the wild. Seed dealers do carry inventories, so be sure to inquire as to species and collection source. The single best resource for seeds or nursery stock is the Plant Materials Directory, which is published yearly as a special issue of the Native Plants Journal:
Indiana University Press
Journals Department
601 N Morton Street
Bloomington, IN 47404-3797
TEL: 800.842.6796
Website: http://www.nativeplantnetwork.org
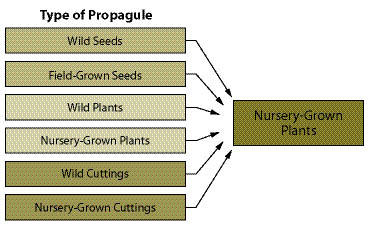
Seeds obtained through federal facilities or seed dealers must report: 1) seed source — location of collection or seed zone; 2) year of collection; 3) seeds per pound; 4) % purity; 5) % ;germination, or tetrazolium (TZ) tests, from recent testing facilities; and 6) amount of noxious weed or other non-crop seeds. If seeds are not available through either of these sources, wild seed collection will be necessary. This can be done under the direction of district or forest botanist or by contract.
Once a plant production contract is awarded, nurseries will request information on each of the seedlots they will be sowing, including the latest purity and germination test results to determine the amount of pure live seeds. In addition, they will require the number of seeds per pound to calculate how many pounds of seeds from each seedlot will be needed to meet your order. They will also factor in the difficulty of growing each species, called the nursery factor, which will be different for each species, stocktype, and nursery. The nursery factor is a prediction of what percentage of seeds sown will become "shippable" seedlings, and considers losses during the growing season as well as those plants which are "culled" during harvesting. Nursery factors typically range from 30% to 50%, which means that they will need to sow 2 to 3 viable seeds for each plant they produce.
| Figure 10.84 — Rooted cuttings are the quickest and easiest way to produce some woody plants, such as cottonwoods and willows. |
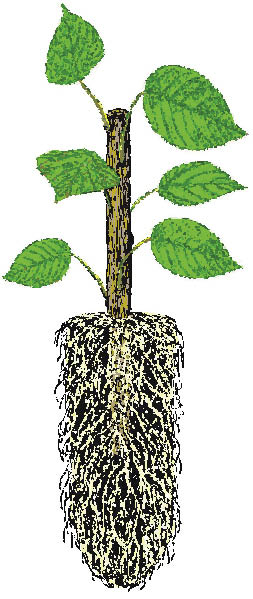 |
You can get a rough idea of how many seeds should be acquired by using the seed tests and a nursery factor of 30%. If the nursery requests significantly more seeds, then it is appropriate to inquire why more seeds are needed.
Starter Plants — Most large container stocktypes are started by moving smaller plants into larger containers or into bareroot growing beds. This practice is called transplanting, and it produces quality plants with large, fibrous, healthy root systems and large stems. Starter plants are typically grown from seeds or cuttings into small plants and then transplanted. In some cases, wildlings can be salvaged from the construction site and brought back to the nursery for transplanting. When ordering large containers, it should be specified that there will be at least one, and sometimes two, transplanting operations. Growing starter plants large enough for transplanting usually takes a year. They are then transplanted, usually in the spring or fall, and grown for another year or two. If seedlings or rooted cuttings are available from other sources, these can be sent directly to the nursery for transplanting, which would decrease production time by a year.
Rooted Cuttings — Rooted cuttings (Figure 10.84) can be shipped directly from the nursery for outplanting or serve as starter plant material for transplanting into larger containers. One big advantage of this stocktype is that cuttings can be collected each year, whereas seeds may be more difficult to procure. While cuttings of most species are derived from stems or branches, some species like, quaking aspen (Populus tremuloides) must be started from roots. Rooted cutting production is discussed in detail in Section 10.2.5.
10.2.6.7 Develop Growing Contract
All nurseries experience weather extremes, insect or disease losses, equipment failures, and other production problems that can severely decrease the quantity and quality of the stock. Therefore, it is a good strategy to reduce these inherent risks by growing plants at more than one nursery. In doing this, you will begin to see the strengths and weaknesses of each nursery. Future ordering can use this information to decide where to grow each species.
Nursery Selection — The western United States has an abundance of nurseries that grow native plants, but few will offer plants from source identified plant materials specific to your project. Obtaining genetically appropriate plants will require finding nurseries willing to grow seedlings from specified genetic material. A current list of native plant nurseries can be found in the Plant Materials Directory (See Section 10.2.6.6).
When considering a nursery for plant production, there are some basic factors to consider:
- Proximity. Is the nursery close enough to visit occasionally?
- Service. Is the staff easy to contact? Do they promptly return phone calls or e-mails? Are they friendly and helpful?
- Expertise. Are they knowledgeable in restoration and revegetation?
- Years in business. Has the nursery been in business for at least 3 years?
- Seedling quality. Is the overall seedling quality high?
- Seedling quantities. Are the orders regularly met or do they consistently run short?
- Price. Are prices competitive?
- Willingness. Will the nursery try new things?
If there are doubts about one or more of these factors, you might consider growing at another nursery. Ultimately, the selection comes down to personal experience with nurseries and word-of-mouth from other revegetation specialists.
Seedling Orders — A plant production contract must detail the information you have developed in previous sections of this chapter:
- Species,
- Genetic source,
- Starter plant material,
- Stocktype,
- Net amount of plants,
- Month and year for plant delivery,
- Minimum seedling specifications, and
- How they will be processed and stored.
A few phone calls to nurseries will give you some idea which ones will grow the species, stocktype, and quantities necessary for your project. Nurseries can still be utilized if they can only meet a portion of the order. Other nurseries can produce the remainder because there is less risk by sending plant orders to several nurseries. Contracts can be developed once you have some idea of what portions of an order a nursery can produce.
Plant Processing and Storage — Once seedlings have reached the target size and age at the nursery, they are harvested, stored, and processed for shipping. If the plants are bareroot seedlings, they are lifted from the soil, graded, and packaged. Container seedlings can be extracted from the containers, graded, and packaged, or sent to the planting site in containers and extracted immediately before planting. Either way, most stocktypes will be held at the nursery for one to six months, depending on when they are needed for planting. "Planting windows" are discussed in more detail in Section 10.3.4.
Storage times are longest for seedlings planted in the late winter and spring. For these orders, plants are extracted from their containers or lifted from the soil in the winter when they are least susceptible to the stress or damage associated with extraction, handling, and packaging. Plants in this condition are dormant. The onset of plant dormancy for deciduous plants is often around the time when plants have lost their leaves in late fall; the end of dormancy begins just before the buds begin to swell in the late winter to spring. The dormancy period for conifer species is not visibly discernible, but typically follows a similar time frame as deciduous species. Seedling dormancy in the western United States typically extends from December through February, but the dates will vary by nursery. If plants are to be extracted and held in cold storage for long periods, it is important to known when the nursery is extracting and handling the seedlings to be sure these operations are done when seedlings are dormant. Seedlings that are extracted or lifted outside the seedling dormancy period and stored for any length of time will survive and perform poorly.
When plants are lifted from bareroot beds or extracted from containers, they are also being graded for size and appearance. Unless otherwise agreed, the size specifications stated in the contract will be the grading criteria (Figure 10.85). It is good to be at the nursery during lifting/extraction and grading to see which seedlings are being thrown away and which seedlings are considered shippable. Bareroot and smaller container plants are graded and boxed for refrigerated or freezer storage. Storage containers will have important information about the plants, such as seedlot, date packed, client name, and the number of seedlings in the container. Plants are typically held in cooler storage (32 to 35 °F) from a few weeks to two months. If longer storage is required, freezer storage (28 to 31 °F) is recommended to maintain seedling quality and reduce the chance for storage molds.
Large container stocktypes (typically those equivalent to a half gallon or larger) are stored and transported in the containers in which they are grown. They are typically stored in shadehouses or other sheltered storage. In cold climates, the roots should be insulated to protect against cold injury. During unseasonably warm periods during the late winter or early spring, large container stock should be monitored for drying and irrigated if necessary.
Grading Specifications — There are no nursery-wide minimum nursery standards for the size and appearance of nursery grown plants because of the wide variety of ages, stocktypes, and growth patterns of native species. Nevertheless, you must establish some criteria for accepting or rejecting plants or you might be receiving marginal plants. Being present at the time of packing is the most effective way to negotiate grading standards with the nursery and assure that you receive quality plants.
Typical grading standards fall into the following categories (Figure 10.85):
Stem diameter at root collar ("caliper") — Stem caliper is the single most important morphological measure of nursery plant quality and has been consistently correlated with outplanting survival and growth. Diameter is not necessarily a good measurement for rooted cuttings since the size of the stem is dependent on the original diameter of the cutting. A typical grading specification for many bareroot and container stocktypes is a minimum diameter of 3.5 to 4.0 mm for one-year-old seedlings, and greater than 4.0 mm for plants grown for two years. Discuss these specifications with the nursery, since not all species will grow to these sizes in this time frame.
Shoot height — The height of the plant is measured from the root collar, or original ground line, to the top of the terminal bud. Some species do not form a terminal bud, so the swollen meristem tip or even the average top of the crown is used.
Root system — The root system of the plant should be examined carefully. For bareroot stock, the roots should be well developed and fibrous and approximately the same area as the crown. For container stock, the root "plug" must be firm but not too root-bound. If the roots have spiraled and formed a tight mass at the bottom of the plugs, they should be trimmed during harvesting.
Seedling Balance — Nursery stock should have a good ratio between the amount of foliage and the root system. This is traditionally expressed as a shoot-to-root ratio (S:R), and typically ranges from one or two part shoots to one part roots (an S:R from 1:1 to 2:1). This grading standard is a qualitative determination to whether the root system is large enough to support the above-ground portion of the plant.
| Figure 10.85 — Grading criteria for seedlings are based primarily on stem diameter, height, terminal bud, root volume, and integrity. |
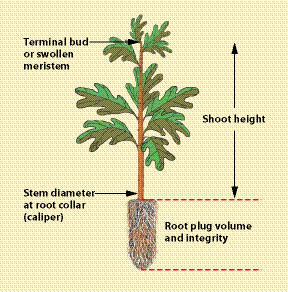 |
General plant health — During grading, nursery stock should be inspected for physical injury or disease. Root disease is a particular hazard of container stock, and soft or moldy roots should be suspect. Scraping the roots with the blade of a knife should reveal white healthy tissue.
10.2.6.8 Administer Contract
The nursery manager should be required to maintain records on how the plants were cultured. The basic information should include: date plants were started; the type, rates, and timing of fertilizer applications; irrigation schedules; greenhouse settings (temperature, lighting, humidity); pesticide applications; and any significant problems that might have occurred with the seedlot. The nursery is also required to give an accounting, or inventory, of your plant orders by late summer.
It is important to visit nurseries at least once a year, but more often is better. These visits will give you an indication of the quality of the stock you will be receiving and whether the number of seedlings you ordered is being met. It also helps strengthen the relationship between you and the nursery manager, which often leads to more attention being given to your orders. One of the best times to visit is during the initial plant establishment phase, which is during the late spring or early summer after seeds have germinated or seedlings and cuttings have been planted. If there are stock problems, they are most likely to be observed at this time. If for some reason there is a fall-down in the inventory or the seedlings look unhealthy at this time, you have an opportunity to discuss it with the nursery manager. If caught early enough, there can be time to start more plants. At the minimum, identifying problems early will give you time to adjust your planting plans as well as adjust other contracts that depend on the plant inventory.
Another good time to visit is during the processing of plants for storage or shipment. Your presence at this time helps the nursery manager with questions that might arise about grading specifications, packaging materials, pruning, and other operations that occur at this time. It gives you a good picture of what type of stock you will be receiving when it is shipped to the planting areas. It is never an enjoyable experience to open up a box of seedlings, with planters standing around, and be surprised to find that the seedlings are not at all what you were expecting.