ROADSIDE REVEGETATION
An Integrated Approach to Establishing Native Plants and Pollinator Habitat

6.5 Photo Point Monitoring Procedures
Photo point monitoring is a method of recording landscape changes in vegetation over time and showing the success or failure of a revegetation project. Photo monitoring can be established for long-term monitoring where a permanent point has not been established and subsequent photographs are taken (Section 6.5.1) or where permanent locations have not been located from historic photographs or photo monitoring can be reconstructed from historic photographs (Section 6.5.2).
Landscape images from photo point monitoring, in conjunction with data collected from other monitoring methods, can be a powerful way to describe the results of a revegetation project. Hall's Photo Point Monitoring Handbook (2002a, 2002b) provides a thorough coverage of this subject.
6.5.1 Establishing Photo Points for Long-Term Monitoring
Locating Photo Points
The first step in establishing a long-term photo-monitoring point is to determine where the photo will be taken. The locations of the photo point are often based on the objectives of the revegetation project. For example, if the objectives for revegetation are visual enhancement, photo points are located where motorists view the vegetation of interest from the road. With time, small shrub and tree seedlings planted along roadsides will fill in the entire picture frame, obscuring any long-distance views. If it is important to photograph long-distance views, then the location and direction of the camera are placed where the foreground is free of potentially tall growing vegetation.
Photo point locations are recorded with GPS coordinates and described in detail so they can easily be found years later by other personnel. Permanent structures that can be easily described and located by others make good reference points for photo locations. These include large boulders, culvert inlet and outlet, concrete headwalls, drain inlet frames or concrete aprons, topographical features, guardrail posts, permanent survey markers, mile post markers, road signs, road intersections, railroad lines, telephone poles, and other types of utility structures. Since these features are not always permanent, it is important to locate more than one structure in the field.
The photograph is either taken from a permanent structure or from a measured distance and direction from the structure. For example, a photographer might decide to take a picture on the fog line directly above a culvert outlet. This spot would be easy to describe and locate in the field by another person several years later. A photographer might also locate a photo point using a sign post as a permanent reference. In this case, an azimuth reading and measured distance from the sign post would be recorded in the notes.
A common method for locating a photo point is to drive a stake (rebar) at the spot. This method works in some cases but has drawbacks: the stake may interfere with maintenance activities, such as mowing or traffic safety if it is not set back far enough from the roadway; the stake is driven several feet into the soil, which is difficult on most cut slopes and some fill slopes; and the stake is identified with a tag that must be readable over time. One problem associated with poorly placed stakes is that they are often displaced through active soil movement, animal traffic, vandalism, or road maintenance activities. Using a more permanent feature of the roadside, such as a concrete structure, guardrail, or signpost, is generally a better alternative.
The Camera
When using a digital camera for photo point monitoring, the highest resolution is used. Using cameras with good lens quality is also essential for optimum photographs. The camera is situated so that the zoom lens does not have to be used. The zoom lens can pose problems in reproducing the original photograph (Hall 2002b) and also result in lower picture resolution.
Taking the First Picture
The camera is set on a tripod over the identified photo point location and the image is previewed on the LCD screen or through the lens. With a compass aligned to the side of the camera, an azimuth reading is taken. Using a clinometer on the top of the camera, the degrees from horizontal are recorded. A log or electronic document is kept that includes the following information about each photograph:
- Project name
- Photograph ID
- Date
- Time
- Photographer
- GPS location
- Location on plan map
- Location description
- Azimuth of camera
- Angle of camera
- Manufacturer and model of camera
- Large imported jpeg image of photograph
Taking Subsequent Photographs
At later dates, the photo point is relocated using the map, GPS point, and/or and location description. The camera azimuth and vertical angle are set, and the image is viewed through the LCD screen or lens and compared to the print of the original photograph. If the original spot cannot be located, then relocating the photo point can be attempted using the procedures outlined in the following section.
6.5.2 Establishing Photo Points from Historic Photographs
If no records exist for the original photo locations, then a close approximation can be determined (after Hall 2002a). Prior to monitoring, all historic photographs of interest are printed out in large format. The general locations along the road corridor where these photographs may have been taken are located. Based on the photograph, permanent features, such as guardrails, culverts, trees, shrubs, road cuts, and fills, are found. The general area is walked while comparing the large photograph with the surrounding area. Finding several permanent reference points in the distance, such as mature trees or large rocks, and moving until all features are positioned similar to the photograph is a quick means of establishing a general location for the original photograph. Figure 6-24 shows how a photo point was located using guardrails and a culvert as reference points.
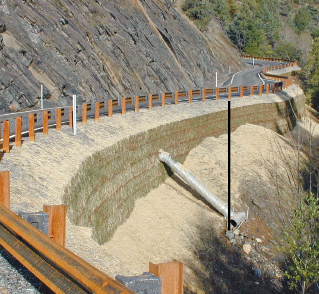


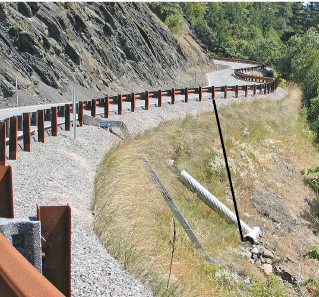

Figure 6-24 | Establishing photo point locations from historic photographs
To relocate the photo point from the original photograph (A), a large print was made and taken to the general location in the field. Since the original photograph was taken from the paved road surface on the inside of the guardrail, there was little doubt that the elevation of the second photograph (B) would be approximately the same.
Locating the original photo point along the guardrail was accomplished by establishing a relatively vertical centerline connecting two identifiable reference points on both the original photograph (A) and the photograph to be taken (B). In this example, the centerline is drawn from the left side of the culvert (1) to the 12th post of the guardrail (2) from the reflector stake (3). Picture B is a close approximation to the photo point location of photo A, but notice that the centerline is not quite in the same direction as in photo A. To find the more exact location, the photographer would move to the right along the inside of the guardrail until the centerline lines up in the same direction as in photograph A.
Photos credit: David Steinfeld